15 Brilliant Pool Noodle Christmas Decorations That Look High-End on a Budget
Here’s a little secret from the craft world. A lot of those big, fluffy ornament garlands selling for a few hundred dollars, and many of the oversized candy canes lining fancy front walks, start with the same thing your kids float on in July. A two-dollar pool noodle.
The catch is that foam can be fussy. A regular hot glue gun melts deep craters right into it. Bend a noodle too fast and it kinks or snaps. And the ornaments you so carefully attached slowly roll off onto the floor three days later, usually right before guests arrive.
The fix is simple once you know it. Use low-temp glue or foam-safe adhesives, reinforce the hollow core with a dowel, PVC pipe or wire, and lock heavy pieces in place with toothpicks and zip ties. Do that, and a pool noodle frame can hold up for years.
So here are 15 pool noodle Christmas decorations I’ve built with burned fingertips and a lot of trial and error, each with step-by-step assembly and a storage hack so you can use it again next year.
The Foam Engineering and Adhesion Matrix
Swipe sideways on mobile to see the full table.
| Project Category | Internal Reinforcement Core | Safe Adhesive / Fastener | Surface Protection Method |
|---|---|---|---|
| Heavy Mantel Garlands | 1/2 inch PVC pipe or coupler | Low-temp glue plus toothpick anchors | Felt strip under the noodle |
| Archway Doorway Wraps | The noodle itself, slit lengthwise | Zip ties and floral wire | The slit foam cushions the trim |
| Outdoor Lawn Stakes | 9 gauge wire or a dowel over rebar | Outdoor-rated glue and duct tape | Rebar driven into the lawn, not the noodle |
| Suspended Table Swags | Wire hanger straightened inside | Floral wire and zip ties | Ceiling hooks rated for the weight |
15 Pool Noodle Christmas Decorations
1. The Viral Mega-Bauble Mantel Garland on Joined Noodles

Feels like · designer boutique mantel
The Look and High-End Illusion: A thick, overflowing swag of shiny ornaments in mixed sizes runs the full length of the mantel and drips down the sides. A store-bought version this size can easily cost a few hundred dollars, while yours costs a fraction of that.
Hardware and Dollar-Store Supplies:
- Two standard hollow-core pool noodles
- An 8 inch piece of 1/2 inch PVC pipe
- 60mm, 80mm and 100mm shatterproof baubles
- A low-temp glue gun and a box of toothpicks
The Foam-Engineering Assembly Step:
- Push the PVC piece 4 inches into the end of each noodle so they join into one long, straight base.
- Wrap the whole base in faux greenery or tinsel garland so no foam shows through gaps.
- Pull the cap off each ornament, put a dab of low-temp glue in the neck, push in a toothpick and glue it back on. Then stab the toothpick into the noodle, starting with the biggest baubles.
Lay a felt strip under the garland to protect the mantel. For the rest of the mantel styling, my Thanksgiving mantel decor ideas show how to balance a big garland with candles and greenery.
Practical Teardown and Storage Hack: Pull the PVC joint apart so the garland becomes two halves. Store each half in a long under-bed box, ornaments up, so nothing gets crushed.
2. Giant Walkway Peppermint Candy Canes on 9-Gauge Wire

Feels like · candy lane welcome
The Look and High-End Illusion: Big striped candy canes line the front walk, bold and bright from the street. Comparable store-bought yard canes run much more per pair, and these look just as polished.
Hardware and Dollar-Store Supplies:
- White pool noodles
- A 6 foot length of 9 gauge wire per cane
- Red outdoor vinyl tape or red duct tape
- 24 inch rebar stakes
The Foam-Engineering Assembly Step:
- Feed the wire through the center hole, leaving about 12 inches sticking out of the bottom.
- Warm the top section with a hairdryer, then slowly bend it into a hook. The wire holds the shape.
- Wrap red tape in a diagonal spiral, then drive rebar into the ground and slide the bottom of the cane over it.
Practical Teardown and Storage Hack: Pull the canes off the rebar and flag the rebar so nobody trips or mows over it. The canes hang neatly from a garage hook by their curves.
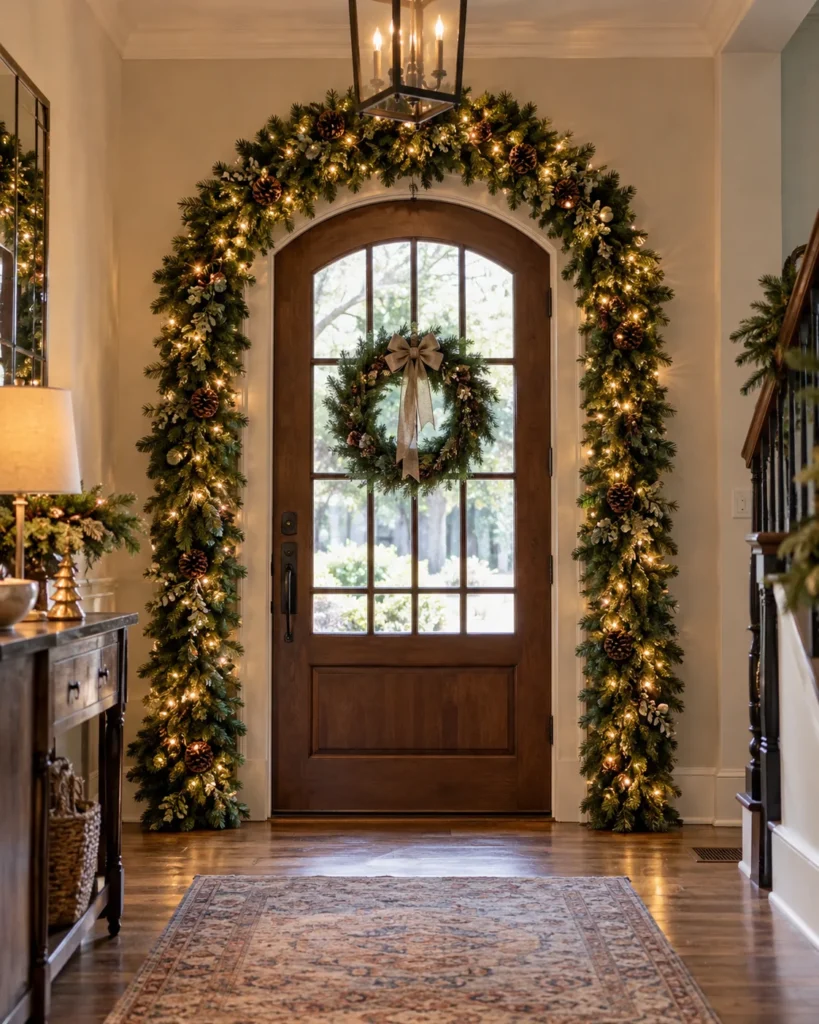
3. Over-the-Door Archway Garland Slit to Protect the Trim
Feels like · grand holiday entrance
The Look and High-End Illusion: A thick garland of pine and ornaments arches over an interior doorway or front door. It looks like a professional installation, but it’s just slit noodles hugging the trim.
Hardware and Dollar-Store Supplies:
- 2 or 3 pool noodles
- A utility knife
- Faux pine garland
- Zip ties and lightweight shatterproof ornaments
The Foam-Engineering Assembly Step:
- Slice each noodle lengthwise down one side only, just to the center hole.
- Press the slit noodles over the top and side trim so the foam grips the wood.
- Zip-tie the garland around the noodles, then add ornaments with toothpick anchors.
Practical Teardown and Storage Hack: It pops right off with no screws or nails, which is perfect for renters. Keep heavy ornaments off the top section so nothing pulls it loose.
4. Jumbo Wrapped Hard Candies in Iridescent Cellophane
Feels like · giant sweet shop
The Look and High-End Illusion: Big glossy candies with twisted wrapper ends scattered along the porch or yard, shimmering in iridescent cellophane. They look like oversized store props for pennies each.
Hardware and Dollar-Store Supplies:
- Pool noodles cut into 12 inch pieces
- Colored duct tape or spray paint safe for foam
- Iridescent cellophane
- Zip ties
The Foam-Engineering Assembly Step:
- Wrap each piece in colored duct tape, adding a white spiral stripe for peppermint.
- Roll it in cellophane with 8 inches extra on each end.
- Twist the ends and cinch them tight with zip ties, then fluff the cellophane.
Practical Teardown and Storage Hack: Outdoors, tuck a small rock inside the hollow core before wrapping so they don’t blow away. They stack flat in a storage tote.
5. Spiral Lollipop Lawn Stakes on Wooden Dowels

Feels like · Candy Land front yard
The Look and High-End Illusion: Big swirled lollipops on tall white sticks pop up along garden beds. They’re cheerful, bright and look like high-end props for a holiday shop window.
Hardware and Dollar-Store Supplies:
- Two pool noodles in different colors per lollipop
- A 3 foot, 1 inch wooden dowel
- Clear packing tape or clear cellophane
- Low-temp glue
The Foam-Engineering Assembly Step:
- Hold two noodles side by side and roll them together into a tight spiral, gluing as you go with low-temp glue.
- Wrap the spiral tightly with clear tape so it holds its shape.
- Push the dowel into the bottom of the spiral and glue it, then push the dowel’s other end into the soil.
Practical Teardown and Storage Hack: If you’d rather use shrink wrap, warm it carefully with a hairdryer on high, not a heat gun, since too much heat can soften foam. They store upright in a bucket in the garage.
A friend once grabbed her regular high-temp glue gun to attach baubles to a noodle garland. Every dot of glue melted a crater straight into the foam, the ornaments slid into the holes and the whole thing smelled like burnt plastic for an hour.
The fix: Use a low-temp glue gun and lean on toothpicks or floral wire for the real holding power. Glue is just the helper.
6. Slit Banister Sleeve Wrapped in Pine and Velvet Bows

Feels like · grand staircase Christmas
The Look and High-End Illusion: A full, lush garland runs up the banister with big velvet bows every few feet. It looks thick and designer, but underneath is a slit noodle protecting the wood.
Hardware and Dollar-Store Supplies:
- Enough pool noodles to cover the rail
- Thick faux pine garland
- Wired velvet ribbon for bows
- Zip ties
The Foam-Engineering Assembly Step:
- Slit the noodles lengthwise and press them onto the outside face of the banister, not the top of the handrail.
- Wrap pine garland around them and zip-tie it every 12 inches.
- Tie velvet bows every 2 to 3 feet.
Practical Teardown and Storage Hack: Keep the top of the handrail clear so people can still hold on. Slide the whole garland and noodle set off together and coil it into a large tote.
7. Oversized Teardrop Bauble Wreath From Looped Noodles

Feels like · statement porch welcome
The Look and High-End Illusion: A huge teardrop-shaped wreath packed with shiny baubles and pine sprigs hangs on the porch wall or a big front door. A wreath this size from a boutique costs a lot more than the supplies here.
Hardware and Dollar-Store Supplies:
- Two pool noodles
- Duct tape
- 40 to 60 shatterproof baubles
- Pine sprigs and floral wire
The Foam-Engineering Assembly Step:
- Tape two noodles end to end, then bend them into a loop and pinch the top into a teardrop point.
- Wrap the joint and point tightly with duct tape.
- Cover with pine, then add baubles with toothpick anchors, largest first.
Practical Teardown and Storage Hack: Hang it on a heavy-duty hook rated for the weight. Store it hanging in the garage or flat on a shelf with nothing stacked on top.
8. Floating Dining Table Greenery Swag With Heavy Jingle Bells

Feels like · magical floating forest
The Look and High-End Illusion: A long, lush greenery swag floats above the dining table, with jingle bells dangling below. It looks like a pricey event installation and keeps the table itself completely clear.
Hardware and Dollar-Store Supplies:
- One pool noodle with a straightened wire hanger inside
- Faux greenery garland
- Large brass jingle bells
- Two ceiling hooks and clear fishing line
The Foam-Engineering Assembly Step:
- Slide a straightened wire hanger through the noodle so it can’t sag.
- Wrap greenery around it and zip-tie it every 8 inches.
- Hang it from two ceiling hooks with fishing line, about 30 inches above the table, and tie bells along the bottom.
With the swag overhead, the table stays open for food. Keep the centerpiece low, like the ideas in my neutral dining room centerpiece styling guide.
Practical Teardown and Storage Hack: Use ceiling hooks rated well above the swag’s weight, and screw them into a joist if you own the home. Renters can hang it from a curtain rod over a window nook instead.
9. Spiral Porch Column Wraps With String Lights and Burlap

Feels like · glowing farmhouse porch
The Look and High-End Illusion: Porch columns wrapped in a thick spiral of burlap and warm lights, like a giant candy cane in farmhouse tones. It makes the whole entry glow at night.
Hardware and Dollar-Store Supplies:
- 2 or 3 pool noodles per column
- Outdoor-rated warm white string lights
- Wide burlap ribbon
- Outdoor zip ties
The Foam-Engineering Assembly Step:
- Tape noodles end to end into one long rope.
- Wrap burlap around the noodle rope, then wind the lights over the burlap.
- Spiral it around the column and zip-tie it at the top and bottom.
Practical Teardown and Storage Hack: Plug lights into a GFCI outdoor outlet. When you take it down, unspiral it in one piece and coil it loosely in a big bin so it’s ready next year.
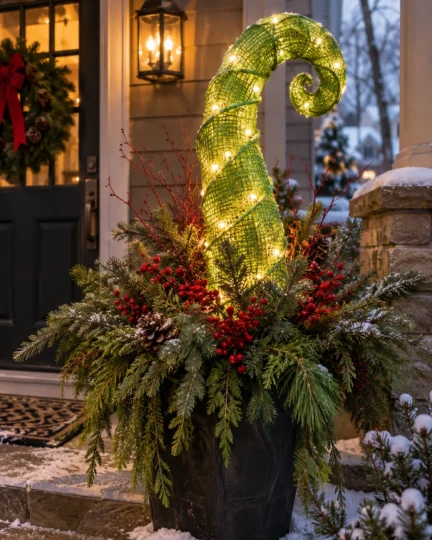
10. Curled Whoville Chimney Pick Shaped With a Hairdryer
Feels like · Seussian rooftop
The Look and High-End Illusion: A tall, curling lime green pick rises out of a planter or the top of the tree, wrapped in sparkly deco mesh. It’s playful and whimsical without looking cheap.
Hardware and Dollar-Store Supplies:
- One pool noodle
- A 9 gauge wire, slightly longer than the noodle
- Lime green deco mesh
- A hairdryer and zip ties
The Foam-Engineering Assembly Step:
- Push the wire through the center hole.
- Warm one section at a time with the hairdryer for 30 seconds, then gently bend it into a curl.
- Wrap the curl in deco mesh and zip-tie the ends.
Practical Teardown and Storage Hack: The wire holds the curl, so it stores in the same shape. Lay it in a long box so the mesh doesn’t get crushed.
A reader built a beautiful ornament garland without any core inside the noodle. By day three, it had sagged so much in the middle that it looked like a frown across her mantel, and two ornaments had rolled onto the hearth.
The fix: Always reinforce long noodles with a PVC pipe, dowel or straightened wire hanger through the center. It keeps the line straight all season.
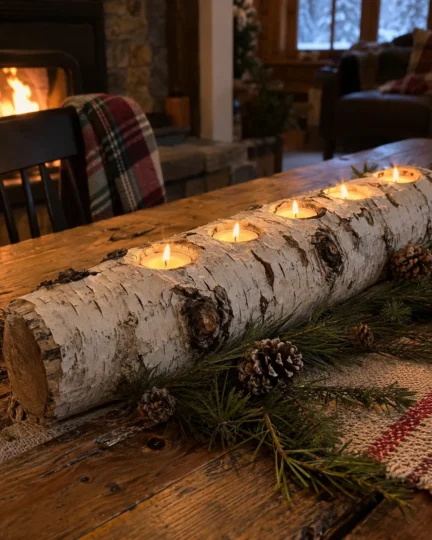
11. Faux Birch Yule Log Centerpiece Hollowed for LED Votives
Feels like · cozy cabin table
The Look and High-End Illusion: A white birch log with dark knots and peeling texture holds a row of glowing votives on the table. It looks like a real log from a pricey home store, but it’s foam.
Hardware and Dollar-Store Supplies:
- A thick pool noodle cut to 18 to 24 inches
- Lightweight spackle and a putty knife
- White, grey and black acrylic paint
- 3 or 4 LED tea lights
The Foam-Engineering Assembly Step:
- Score shallow horizontal lines with a knife to mimic birch bark.
- Spread a thin layer of spackle, let it dry, then paint white and add grey and black bark marks.
- Cut small round holes along the top just big enough for each LED tea light.
Only use LED tea lights here, never real flames. Birch looks lovely around the house too, like the textures in my fall living room decor ideas.
Practical Teardown and Storage Hack: Wrap the log in a towel so the spackle doesn’t chip, and store it in a shoebox with the tea lights.
12. Free-Standing Giant Nutcracker Legs by the Hearth

Feels like · toy soldier guard
The Look and High-End Illusion: Two tall toy soldier legs with shiny black boots and bright stripes stand guard by the fireplace. They’re bold and theatrical, the kind of statement piece that usually costs a lot.
Hardware and Dollar-Store Supplies:
- Two pool noodles
- Two wooden dowels and a small wooden base
- Red, white and black duct tape
- Black craft foam for boots
The Foam-Engineering Assembly Step:
- Screw two dowels upright into a small wooden base.
- Slide a noodle over each dowel.
- Wrap the bottom third in black tape for boots, then add red and white stripes above.
Keep them away from the fireplace opening. They pair nicely with the soft throws and cozy layers in my cozy Thanksgiving living room ideas.
Practical Teardown and Storage Hack: The noodles slide right off the dowels, so the base and legs store separately in a tall closet corner.
13. Staggered Pillar Candle Trio With Faux Wax Drips

Feels like · cathedral candlelight
The Look and High-End Illusion: Three chunky “candles” in staggered heights, with realistic wax drips running down the sides and LED flames on top. They look like oversized church candles for a fraction of the price.
Hardware and Dollar-Store Supplies:
- Thick white pool noodles cut to 12, 18 and 24 inches
- Mod Podge or white acrylic paint
- A low-temp glue gun
- 3 LED flicker tea lights
The Foam-Engineering Assembly Step:
- Seal each noodle with two coats of Mod Podge or paint so the foam has a protective skin.
- With a low-temp glue gun, drip glue down from the top edge to make wax drips. Don’t use high-temp glue, which will melt right through.
- Paint the drips white and set an LED tea light in the top opening.
Group them on a tray with greenery, the same way I layer candles in my fall tray decor ideas.
Practical Teardown and Storage Hack: Store them standing upright in a box so the drips don’t crack, and pop the tea light batteries out first.
14. Heavy-Duty Circular Wreath Base Joined With Duct Tape and Burlap

Feels like · farmhouse front door
The Look and High-End Illusion: A thick, puffy burlap wreath with a big bow and a few sprigs of greenery. It looks just like the chunky farmhouse wreaths at home stores, built on a sturdy noodle base.
Hardware and Dollar-Store Supplies:
- One pool noodle
- Heavy-duty duct tape
- Wide burlap ribbon, about 5 yards
- Greenery picks and a wired bow
The Foam-Engineering Assembly Step:
- Bend the noodle into a circle and push a short dowel piece into both ends to join them.
- Wrap the joint tightly with duct tape.
- Wrap burlap around the ring, overlapping slightly, then add greenery picks and a bow.
Practical Teardown and Storage Hack: Hang it on an over-the-door hanger. Next year, unwrap the burlap and reuse the noodle base with a new look.
15. Jagged Icicle Fringe Carved With an Electric Knife and Mica Flakes

Feels like · frozen winter cottage
The Look and High-End Illusion: Sparkly white icicles hang along the porch eaves, catching the light like real frozen drips. They look like expensive frosted props and cost very little.
Hardware and Dollar-Store Supplies:
- White pool noodles
- An electric carving knife
- Mod Podge and mica flakes or iridescent glitter
- Gutter clips or eave hooks
The Foam-Engineering Assembly Step:
- Slice each noodle in half lengthwise.
- Use the electric knife to carve jagged points of different lengths along one edge.
- Brush with Mod Podge, sprinkle mica flakes and let dry before clipping them to the eaves.
Add warm lights above them so they glow at night. My warm cozy home lighting ideas explain why warm white light makes frosty textures sparkle instead of looking cold.
Practical Teardown and Storage Hack: Store the fringe flat in a long box, with tissue between layers so the points don’t snap.
3 Critical Safety and Construction Rules for Pool Noodle Crafts
- Follow the low-temp rule. Pool noodles are made from polyethylene foam, which melts under high-temp glue and leaves holes and fumes. A low-temp glue gun or a foam-safe outdoor glue like Gorilla All Weather holds without melting, and toothpicks or wire do the heavy lifting.
- Bend with gentle heat. Warm the foam with a hairdryer for about 30 seconds per section, then bend it slowly over a wire core. Skip the heat gun unless it’s on its lowest setting, since too much heat can melt the foam or release fumes. Work in a ventilated space.
- Use noodles to protect your wood. Slit noodles cushion mantels, banisters and door trim, so heavy garlands don’t scratch varnish or paint. Add a felt strip underneath for extra protection.
Frequently Asked Questions
What is the best glue to use on pool noodles for Christmas decorations?
A low-temp glue gun is the best choice for most projects, since high-temp glue melts the foam. For outdoor pieces, a foam-safe all-weather glue works well, and toothpicks or wire add extra strength.
How do you bend a pool noodle into a candy cane shape without creasing or breaking it?
Push a 9 gauge wire through the center, warm the top with a hairdryer and bend it slowly. The wire holds the curve and the heat keeps the foam from kinking.
How many ornaments do you need to cover a standard pool noodle garland?
Most standard noodles are a little over 4 feet long, and a full look usually takes about 40 to 60 mixed 60mm and 80mm baubles per noodle. Adding a few 100mm pieces and greenery fills gaps with fewer ornaments.
There’s something so satisfying about turning a cheap summer toy into the showstopper of your holiday home. With the right glue, a little reinforcement and some patience, these pool noodle Christmas decorations can look as good as anything in a boutique store and last for years. Pick a project, grab a few noodles and have fun with it. Then pin your favorite to Pinterest so it’s ready when the crafting starts.