12 Creative Grinch Christmas Tree Ideas That Will Steal the Show
Catalog trees are lovely. They’re also all the same: perfectly conical, perfectly spaced, perfectly serious. A Grinch tree breaks every one of those rules. The top flops over, a fuzzy leg sticks out of the branches and there’s a lime ornament the size of a grapefruit hanging off the tip. People walk in and laugh before they’ve taken their coats off.
Most people assume that look needs a special whimsical tree or a professional decorator. I thought so too, until I spent an evening on the living room floor with a spool of wire, a bag of zip ties and a very patient 7.5 foot artificial tree.
Here’s the truth. Any standard artificial or flocked tree can be shaped and layered into Whoville. Wire gives you the curve, floral picks give you the wild crown, and smart color contrast keeps it looking playful rather than messy.
So here are 12 Grinch Christmas tree ideas, each with the exact construction steps and a safety check for real homes with toddlers and pets.
The Whoville Tree Anatomy Cheat Sheet
Swipe sideways on mobile to see the full table.
| Tree Style | Essential Anchor Element | Ribbon / Texture Type | Best Base Stand Cover |
|---|---|---|---|
| Dramatic Crooked Curl | 9 gauge wire spine and a heavy end bauble | 2.5 inch wired striped ribbon | Galvanized tub with weights inside |
| Flocked Neon Pop | Chartreuse bulbs clustered near the trunk | Red velvet ribbon | White faux fur skirt |
| Striped Candy Explosion | Lollipop and candy picks at the crown | Red and white candy stripe ribbon | Red and white striped tree collar |
| Whoville Harlequin Cascade | Vertical ribbon drops from the top | Harlequin and polka-dot wired ribbon | Burlap sack skirt |
12 Creative Grinch Christmas Tree Ideas
1. The Drooping Spiral Tip With a Giant 150mm Bauble

Feels like · sleepy Seuss curl
The Tree Silhouette and Vibe: The top of the tree winds into a lazy spiral and droops down, with one huge glossy red bauble swinging at the very end. It’s the classic Whoville shape everyone recognizes instantly.
Key Tree Picks and Supplies:
- A 3 foot length of 9 gauge galvanized wire
- A 6 foot faux pine garland
- One 150mm shatterproof red bauble
- Heavy-duty zip ties
The Construction Secret:
- Zip-tie the bottom 12 inches of wire tightly along the tree’s top pole, using three ties doubled up.
- Wrap the pine garland around the exposed wire so it looks like real branches.
- Bend the wire into a loose spiral, then hang the bauble from the tip with floral wire.
Practical Host / Safety Check: Bend the added wire, never the tree’s own center pole, which can snap. Point the curl toward the wall side of the room so the weight leans against something sturdy.
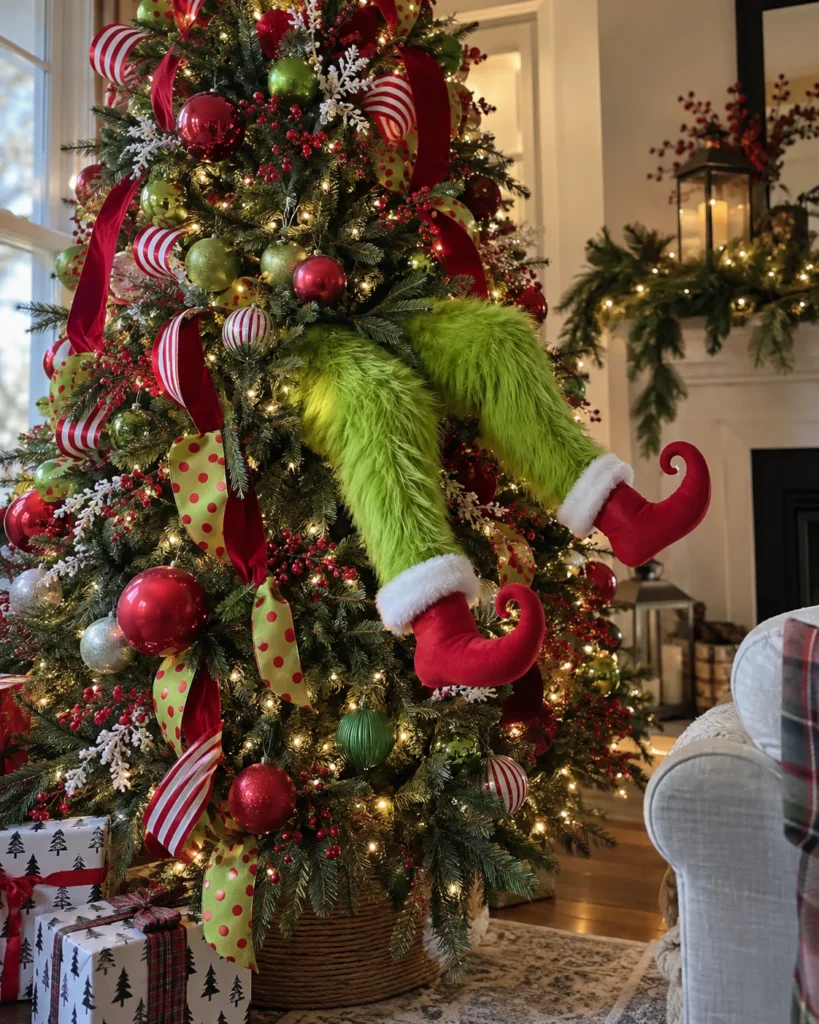
2. The Caught Mid-Climb Tree With Fuzzy Green Legs
Feels like · stuck in the branches
The Tree Silhouette and Vibe: Two fuzzy green legs kick out from the middle of the tree, as if someone dove in headfirst and got stuck. It’s silly, a little chaotic and everyone wants a photo with it.
Key Tree Picks and Supplies:
- Two pool noodles cut to about 24 inches
- Lime faux fur fabric, about one yard
- A pair of fuzzy slippers or felt shoes
- A 2 foot length of 12 gauge wire for each leg
The Construction Secret:
- Push a wire through the center of each pool noodle, leaving 6 inches sticking out at the top.
- Wrap the noodles in fur and hot glue the seam on the back.
- Wrap the exposed wire firmly around the trunk at mid-height, then bend each knee slightly and slip on the shoes.
Practical Host / Safety Check: Pool noodles are feather light, so the legs won’t throw the tree off balance. Mount them at least 3 feet up so toddlers can’t yank on them.
3. Frosted Flocked Pine With Chartreuse Bulbs and Red Velvet

Feels like · snowy Whoville square
The Tree Silhouette and Vibe: A snowy white flocked tree studded with bright chartreuse ornaments and wrapped in fire-engine red velvet. The white base makes the neon green glow without feeling loud.
Key Tree Picks and Supplies:
- A flocked artificial tree
- Chartreuse shatterproof bulbs in 60mm, 80mm and 100mm
- Red velvet ribbon, 2.5 inches wide
- Warm white LED lights
The Construction Secret:
- Light the tree first, wrapping lights from trunk to tip on each branch.
- Hang the 100mm bulbs deep near the trunk, then the 80mm in the middle and the 60mm at the tips.
- Drape velvet in loose diagonal swoops, tucking it every 12 inches.
Practical Host / Safety Check: Flocking sheds, so lay a sheet down while decorating and wear long sleeves. Keep flocked trees away from curious pets, since the powder isn’t something you want them chewing. Leftover velvet ribbon and a few chartreuse bulbs make a quick matching table runner, built low like the setups in my neutral dining room centerpiece styling guide.
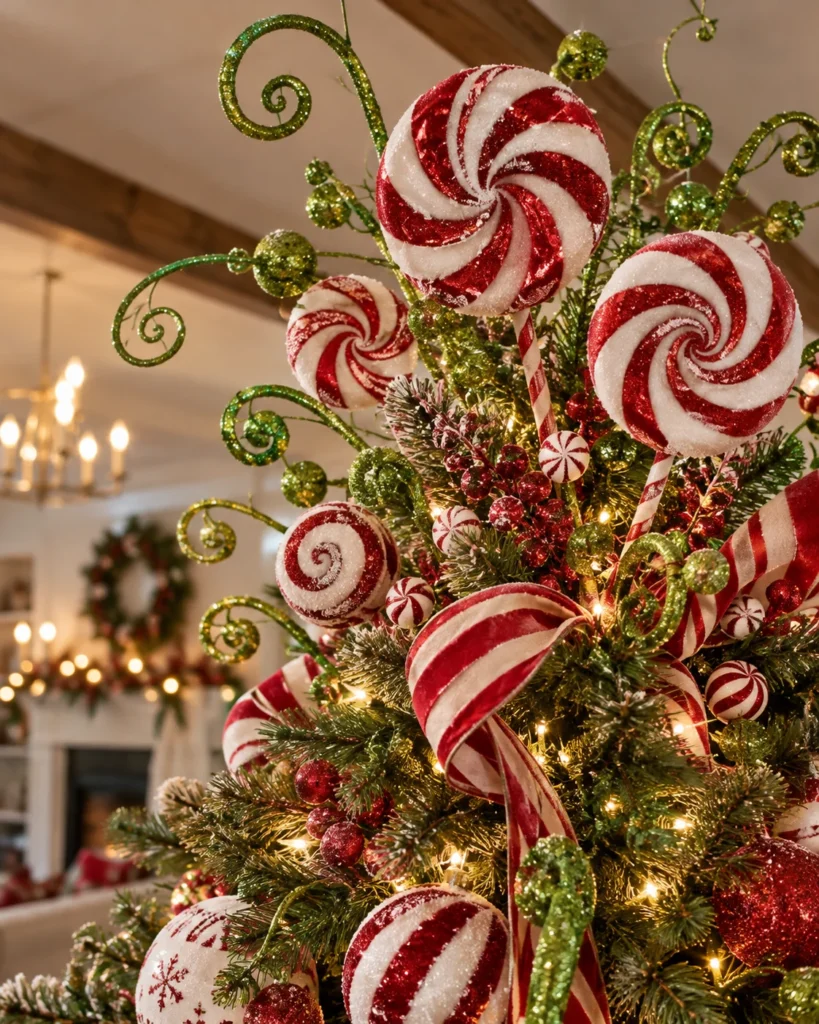
4. Peppermint Lollipop and Curly Lime Pick Burst at the Crown
Feels like · Whoville candy shop
The Tree Silhouette and Vibe: Instead of a single star, the top explodes with oversized peppermint lollipops and curly lime picks spraying out in every direction. It’s like a sugar rush in tree form.
Key Tree Picks and Supplies:
- 5 to 7 faux peppermint lollipop picks
- 8 to 10 curly lime glitter picks
- A foam ball or tree topper base
- Floral wire and zip ties
The Construction Secret:
- Zip-tie a foam ball to the top pole as your base.
- Push the tallest lollipop picks in first, straight up and slightly back.
- Fill in with lime picks angled outward, alternating them with the lollipops.
Practical Host / Safety Check: Pick faux candy, not real lollipops, because real sugar attracts ants and sticky little hands. Check that nothing touches the ceiling or a light fixture.
A friend of mine bent the actual metal top pole of her pre-lit tree into a curl. It looked great for about an hour. Then it made a small cracking sound, the wiring inside snapped and the top two feet of lights went dark for the whole season.
The fix: Always add a separate wire spine to the top pole and bend that. Your tree’s own pole and wiring stay straight and safe.
5. Cascading Harlequin and Lime Polka-Dot Ribbon Billows

Feels like · Whoville circus tent
The Tree Silhouette and Vibe: Long tails of harlequin diamond and lime polka-dot ribbon tumble from the top to the bottom in big, bouncy loops. The whole tree looks like it’s dressed for a party.
Key Tree Picks and Supplies:
- Red and white harlequin wired ribbon, 2.5 to 4 inches
- Lime polka-dot wired ribbon
- Pipe cleaners in green to secure loops
- Sharp fabric scissors
The Construction Secret:
- Start at the top and anchor both ribbons with a pipe cleaner twisted around a branch.
- Every 10 to 12 inches, pinch the ribbon, push the pinch into the tree and secure it, letting the ribbon puff out between pinches.
- Run four or five of these vertical cascades around the tree, spaced evenly.
Practical Host / Safety Check: Store wired ribbon rolled on cardboard tubes, not crushed in a bin, so the wire doesn’t kink. Cut the ends at a sharp angle to stop fraying.
6. The Heart That Grew Three Sizes Red Glitter Gradient


Feels like · happy ending tree
The Tree Silhouette and Vibe: Tiny red glitter hearts at the bottom slowly grow bigger as your eyes move up the tree, ending with one large heart near the top. It tells the story without a single word.
Key Tree Picks and Supplies:
- Red glitter heart ornaments in small, medium and large
- One oversized red heart for the top third
- Simple lime and white round bulbs as filler
- Ornament hooks and floral wire
The Construction Secret:
- Divide the tree into three bands, bottom, middle and top.
- Hang small hearts in the bottom band, medium in the middle and large in the top.
- Wire the oversized heart to the trunk just below the topper so it can’t swing.
Practical Host / Safety Check: Glitter travels everywhere. Choose sealed glitter ornaments, and keep the bottom band shatterproof since that’s where little hands and tails reach.
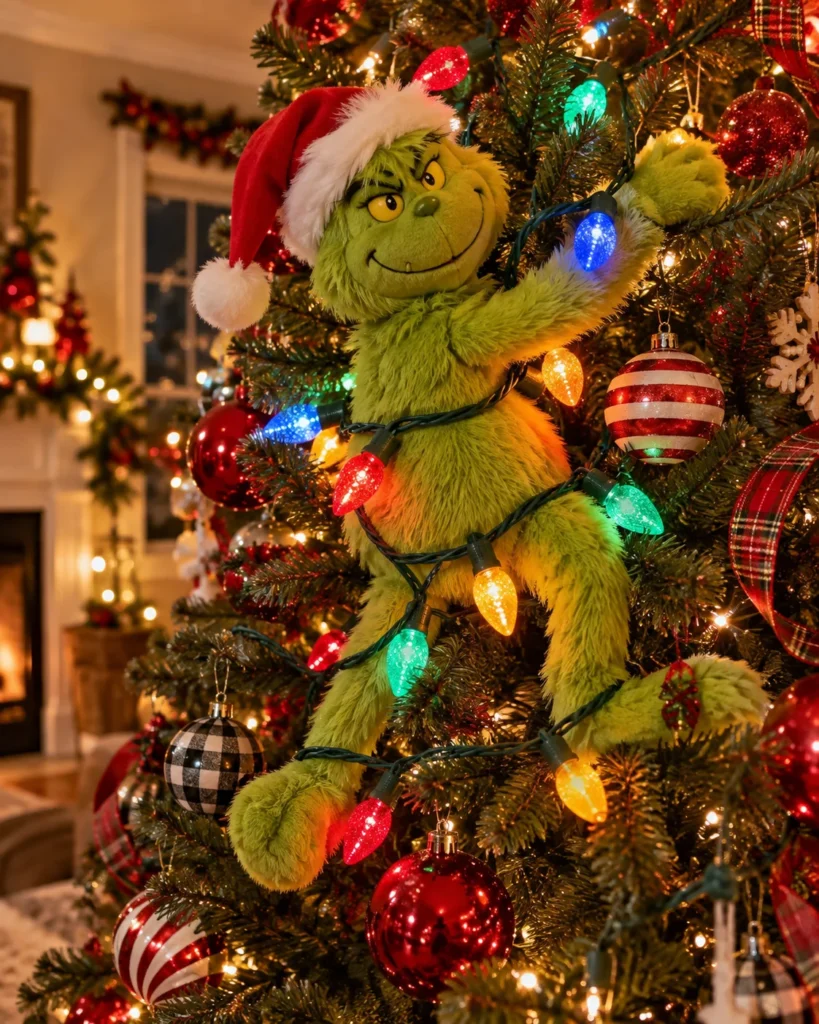
7. Climbing Grinch Plush Tangled in Vintage C9 Bulbs
Feels like · retro holiday heist
The Tree Silhouette and Vibe: A plush figure clinging halfway up the tree, wrapped up in a tangle of chunky multicolored C9 bulbs. The retro bulbs add a warm, nostalgic glow to the joke.
Key Tree Picks and Supplies:
- A medium plush character, 18 to 24 inches
- LED C9 bulbs in a vintage ceramic look
- Clear zip ties
- A short length of 12 gauge wire
The Construction Secret:
- Thread wire through the back of the plush and twist it around the trunk at mid-height.
- Pose the arms and legs around nearby branches and zip-tie them lightly.
- Loop one strand of C9 lights loosely around the plush, then continue it messily around the tree.
Practical Host / Safety Check: Use LED C9s only. Old incandescent C9 bulbs get hot enough to scorch plush fabric. If you want to dim the room so they glow, my warm cozy home lighting ideas show how to balance lamps with tree light.
8. Spiraling Waterfall of Lime Metallic Deco Mesh

Feels like · shimmering Whoville swirl
The Tree Silhouette and Vibe: Puffy lime metallic mesh spirals down the tree like a glittery waterfall, tucked across the branches in big soft waves. It fills gaps and adds instant volume.
Key Tree Picks and Supplies:
- Two 10 yard rolls of lime metallic deco mesh, 21 inches wide
- Green pipe cleaners
- Red and white ornaments for contrast
The Construction Secret:
- Secure the mesh at the top with a pipe cleaner.
- Gather it into a puff, push the gathered section onto a horizontal bough and twist a pipe cleaner around it.
- Spiral down the tree, leaving a puff every 12 to 16 inches.
Practical Host / Safety Check: Metallic mesh can scratch, so wear gloves. Keep the bottom tier mesh-free if you have a cat who likes to chew shiny things.
A reader told me she hung every one of her big 120mm ornaments right on the branch tips so they’d show. The tree looked thin from the side, the tips sagged under the weight, and two bulbs rolled off onto the floor every time someone walked past.
The fix: Large ornaments go deep near the trunk. They fill holes, add depth and stay put.
9. Sparse Mt. Crumpit Woodland Spruce With Crooked Twigs
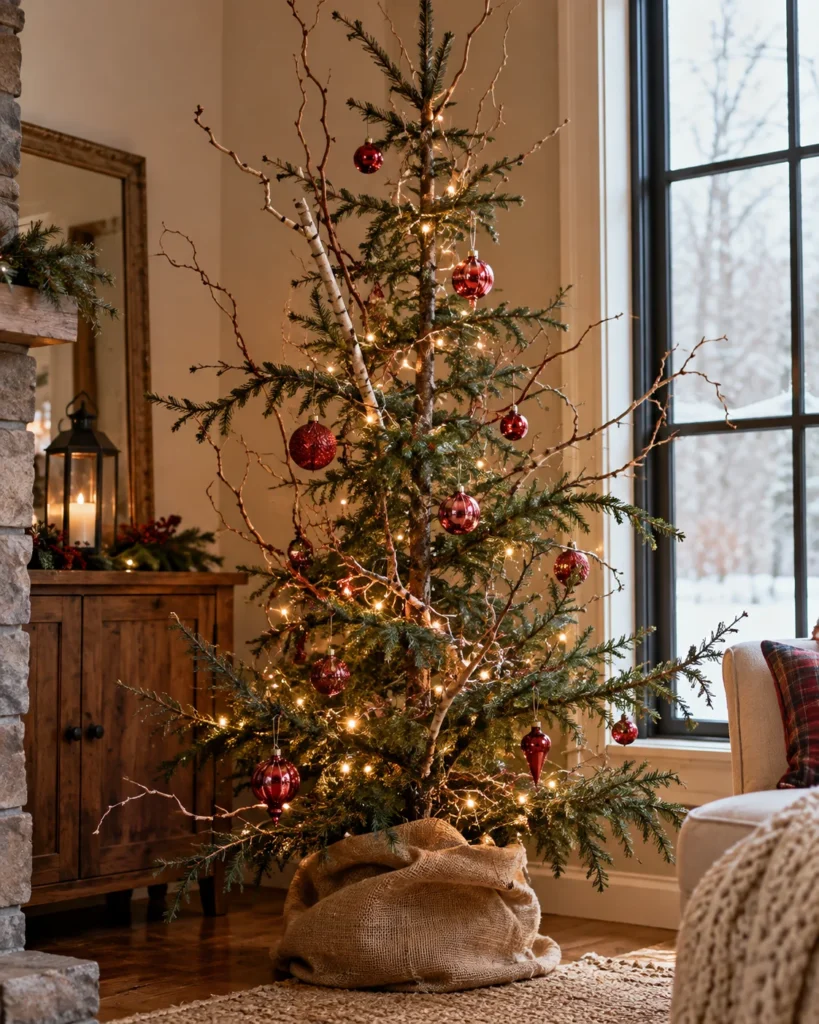
Feels like · lonely mountain cave
The Tree Silhouette and Vibe: A thin, scraggly spruce with twisted twigs poking out and a handful of antique red glass ornaments. It’s the quieter, rustic side of the story, and surprisingly beautiful.
Key Tree Picks and Supplies:
- A sparse or pencil-style artificial spruce
- Curly willow or foraged crooked twigs
- Vintage red mercury glass ornaments
- A burlap ribbon for the stand
The Construction Secret:
- Push twigs deep into the branches so they stick out at odd angles.
- Hang ornaments sparsely, letting the gaps show.
- Finish with one string of warm white lights and nothing else.
Practical Host / Safety Check: Real glass ornaments belong on the top half only. Bake foraged twigs at a low temperature for 30 minutes first so you don’t bring bugs inside. The natural textures here pair nicely with the rustic pieces in my fall living room decor ideas.
10. Burlap Potato Sack Skirt Stuffed With Who-ville Stolen Goods

Feels like · bag full of loot
The Tree Silhouette and Vibe: Instead of a round skirt, two big burlap potato sacks wrap around the stand, overflowing with wrapped boxes, a stocking or two and a roast beast plush peeking out. The base finally gets its own punchline.
Key Tree Picks and Supplies:
- Two burlap potato or coffee sacks
- Empty wrapped boxes in red, white and lime
- A stocking, a toy and a few loose ornaments
- Crumpled newspaper for stuffing
The Construction Secret:
- Split each sack along one side and wrap them around the stand from opposite directions.
- Stuff the backs with newspaper so they stand up.
- Arrange boxes and goodies spilling out of the front gaps.
Practical Host / Safety Check: Burlap sheds fibers, so vacuum around it once a week. Use empty boxes so the dog doesn’t unwrap anything real. The same cozy burlap and throw textures from my cozy Thanksgiving living room ideas carry right into this Christmas setup.
11. Maximalist Whoville Spring Coil and Pom-Pom Crown
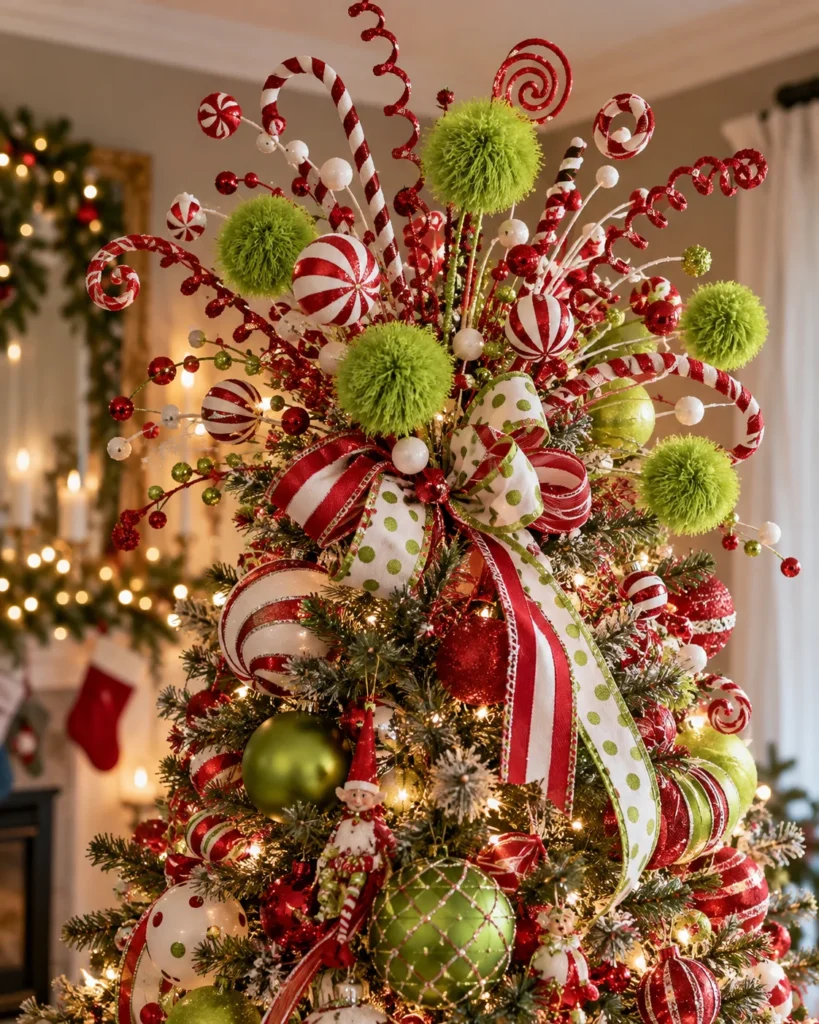
Feels like · Seussian fireworks
The Tree Silhouette and Vibe: The crown bursts with bouncy spring coils, fuzzy pom-poms and striped picks shooting out like fireworks. It’s loud, joyful and completely over the top.
Key Tree Picks and Supplies:
- Spring coil picks in red, white and lime
- Large yarn or chenille pom-poms
- Striped candy picks
- A foam topper base and floral wire
The Construction Secret:
- Wire the foam base to the top pole.
- Insert spring coils first at varied lengths, so they bounce.
- Wire pom-poms onto stiff stems and tuck them between the coils, then fill gaps with candy picks.
Practical Host / Safety Check: Balance the crown so picks lean evenly in all directions. If you love this look but have a small room, repeat a smaller version on a tiered tray, styled like my fall tray decor ideas.
12. The Sneaking Green Arm Topper Snatching the Golden Star

Feels like · almost got away
The Tree Silhouette and Vibe: A long fuzzy green arm stretches up from inside the tree, fingers just closing around a gold star at the top. It’s the perfect final scene for the whole tree.
Key Tree Picks and Supplies:
- A 30 inch length of flexible foam pipe insulation
- Lime faux fur and a fuzzy green glove
- 9 gauge wire for the inner arm
- A lightweight gold star topper
The Construction Secret:
- Thread the wire through the foam, leaving extra at the bottom.
- Wrap in fur, glue on the glove and bend the fingers into a grab.
- Zip-tie the base wire to the trunk below the top, bend the arm upward and wire the star into the fingers.
Practical Host / Safety Check: Choose a light plastic or paper star rather than metal. The arm acts as a lever, so add weight to the stand. After the holidays, store the arm straight in a long box so the wire doesn’t kink. For the rest of the room, a matching mantel garland like my Thanksgiving mantel decor ideas setup can be restyled in red and lime.
3 Essential Engineering Rules for Bent Whoville Trees
1. Counter-Weight the Base
A bent top pulls the center of gravity sideways. Set sandbags or a few bricks over the stand legs, hide them under the skirt, and tie the trunk to a wall hook with clear fishing line.
2. Pinch and Billow Your Ribbon
Pinch wired ribbon every 10 to 12 inches, push the pinch into the tree and let the section between puff outward. Flat ribbon laid along the needles disappears.
3. Hang Big Bulbs Deep
Put 100mm and larger shatterproof ornaments close to the trunk. They hide empty gaps, create depth and keep heavy weight off the branch tips.
Frequently Asked Questions
How do you bend the top of an artificial Christmas tree without breaking the center pole?
Don’t bend the pole itself. Zip-tie a separate length of 9 gauge wire along the top section, wrap it with pine garland and bend that wire into your curl.
What shade of green looks best on a Grinch-themed Christmas tree?
A bright lime or chartreuse reads as Grinch green right away. Pair it with candy red and white so it pops against the deeper green of the tree.
How many yards of ribbon do you need for a fully decorated 7.5-foot Grinch tree?
Plan on roughly 30 yards, or three 10 yard rolls, for a full look. Heavy cascading styles with several vertical drops can use 40 yards or more.
Christmas trees aren’t museum pieces. They’re there to make your family laugh, to get the kids excited and to give guests something to grin about the second they walk in. Bend a branch, stick a fuzzy leg out the side and have fun with it. These Grinch Christmas tree ideas are a starting point, so save your favorite to Pinterest and make it your own.