13 Front Porch Halloween Ideas That Survived a Real Windstorm
You’ve seen the porch photo. Fog rolling down the steps, forty pumpkins, candles everywhere. What you don’t see is that same porch two days later, when the wind took the garland into the neighbour’s hedge and the cardboard tombstones went soft in the rain.
Good porch decorating isn’t about buying more plastic. It comes down to four things. Scale, silhouette, warm 2700K light, and hardware that actually holds. Get those right with six pieces and you’ll beat a porch with thirty.
Everything below has been through the real test. Gusty nights, a rainy week, delivery drivers cutting across the steps, and a stream of trick-or-treaters who do not look where they’re walking. Where something failed, I’ve said so and told you the fix.
Here are the 13 Front Porch Halloween Ideas that earned their place.
What’s in This Guide
Floating Elements: Witch hat canopy, bat swarm migration, floating letters and keys.
Moody Florals & Nature: Gothic dried floral entry, crow and twig archway, boho autumn hybrid.
Minimalist Setups: Heirloom pumpkin staircase, lantern and moss runway, amber ghost gathering.
Statement & Budget DIYs: Apothecary porch, skeleton lounge, wall-crawler spider, boarded-up porch.
Practical Stuff: Wind and rain cheat sheet, real vs faux pumpkins, and the questions I get asked every October.
Three Rules Before You Buy Anything
The 60-30-10 Scale Rule
Sixty percent goes to one large anchor, thirty to a mid-size supporting group, ten to small details. On a small porch that means one big piece and two medium ones, not fifteen small things fighting for attention.
2700K, Never Cool White
Check the Kelvin number on the box. 2700K warm amber makes pumpkins glow and skin look alive. 5000K daylight white turns your whole porch grey and flat, and it’s why some setups look great in photos and terrible in person.
Keep the Delivery Pathway Clear
Leave a clean walking lane about two feet wide up the middle of your steps. Couriers carry boxes they can’t see over and kids run. Decorate the edges, never the tread you actually walk on.
The 13 Porch Setups
1. The Floating Witch Hat Canopy
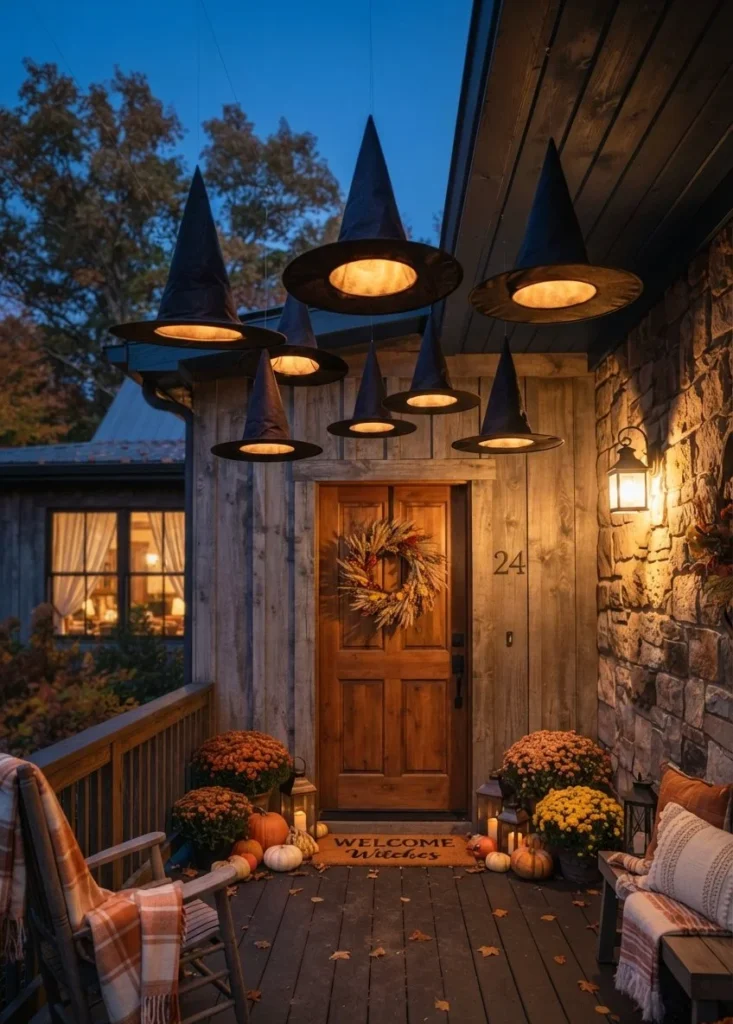
Feels like · A coven parked overhead
The Concept & Visual Anchor: Seven or nine hats hovering at staggered heights over the entry, each with a warm light tucked under the brim. Black felt against a pale ceiling gives you strong silhouette by day and a floating glow by night.
Materials & Exact Hardware: Felt witch hats, 8 lb monofilament fishing line, adhesive ceiling hooks rated for outdoor use, LED tea lights with a six hour timer, and metal washers.
Styling & Pro-Tip: Hang them at three different heights in a loose cluster, not a straight line. Hot glue a washer inside each brim. Mine spun like pinwheels the first year until I added the weight, and now they barely move in a stiff breeze. Tie the line to the hat’s inner seam so the knot never shows.
Budget & DIY Hack: $ to $$. Dollar store hats work fine. If you don’t have a porch ceiling, wedge a spring tension rod across a recessed doorway and hang from that instead.
2. The Gothic Dried Floral & Black Pumpkin Entry
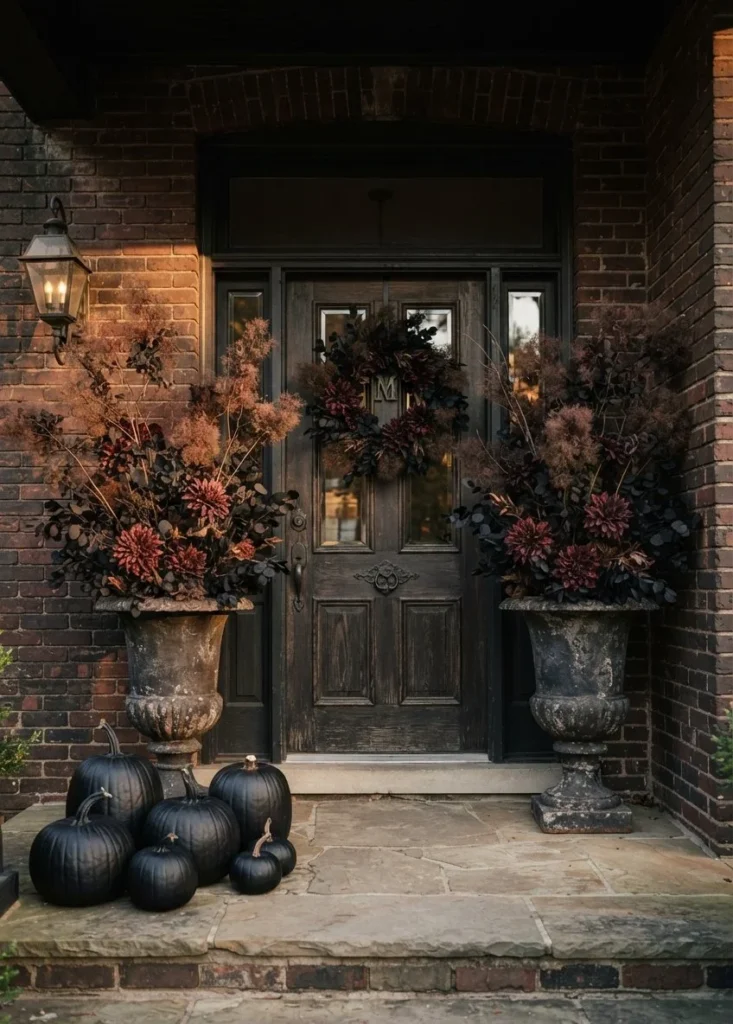
Feels like · Dark romance, not haunted house
The Concept & Visual Anchor: Two tall planters of dried burgundy and near-black florals flanking the door, with matte black pumpkins pooled at the base. Palette stays plum, charcoal and deep green, which reads elegant rather than costume shop.
Materials & Exact Hardware: Two tall planters, dried cotinus or smoke bush branches, dark faux dahlias, matte black spray paint, three real pumpkins, and gravel for the planter base.
Styling & Pro-Tip: Fill the bottom third of each planter with gravel before the foam. Tall planters are the first thing to tip in wind and the weight solves it permanently. Let the branches rise about one and a half times the planter height so they read as architecture.
Budget & DIY Hack: $$. Cut cotinus from your own garden and hang it upside down for two weeks. Use matte spray paint on real pumpkins, never gloss, since gloss catches light and instantly looks plastic.
3. The Cascading Heirloom Pumpkin Staircase
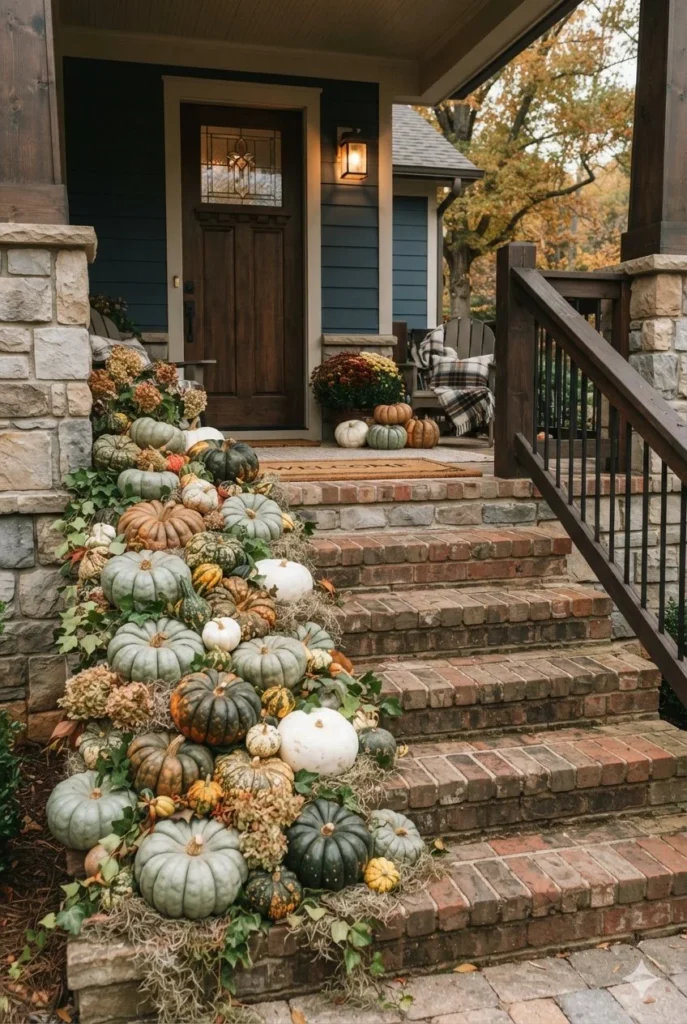
Feels like · A farm stand spilled down the steps
The Concept & Visual Anchor: Pumpkins cascading down one side of the steps in a widening triangle, biggest at the top. Mix Cinderella, white Lumina, green Jarrahdale and small warty gourds so you get texture instead of a wall of orange.
Materials & Exact Hardware: Nine to twelve pumpkins in mixed sizes, clear silicone furniture bumpers, a bag of sheet moss, and a bottle of peppermint oil.
Styling & Pro-Tip: Work in odd-numbered clusters, never pairs. Stick a silicone bumper under each pumpkin so it grips the step instead of rolling. Tuck moss into the gaps where the steps show through. Keep the whole arrangement on one side and leave the other half of the tread walkable.
Budget & DIY Hack: $$. Farm stands drop prices sharply after the 25th. Buy a few big ones and pad the arrangement with small gourds, which cost a fraction.
4. The 3D Bat Swarm Migration
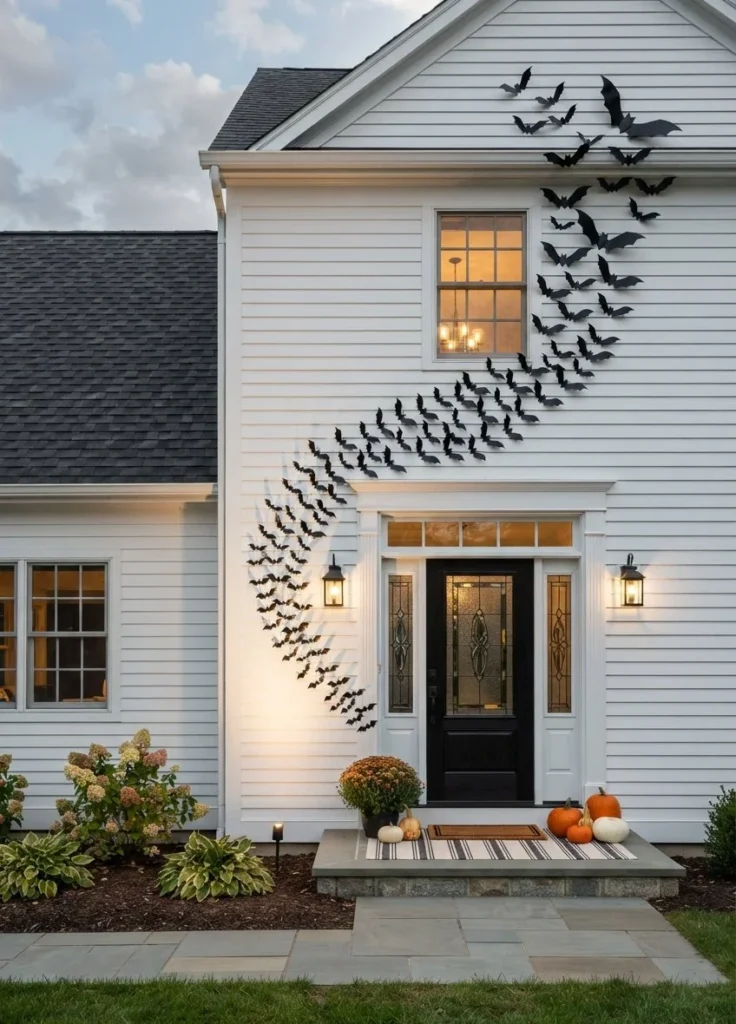
Feels like · Something just left the attic
The Concept & Visual Anchor: Bats curving from the door frame up across the siding, small at the start and growing larger as they climb. The curve is the whole trick. A straight line reads as stickers, a curve reads as motion.
Materials & Exact Hardware: Black plastic report folders, a bat template, blue painter’s tape, outdoor mounting squares, and a battery LED spotlight.
Styling & Pro-Tip: Cut them from plastic folders rather than cardstock. Paper bats curl into tubes after one humid morning, and I learned that the hard way. Tape only the body so the wings stay free, then bend each wing up for a shadow. Put blue painter’s tape on painted siding first so nothing lifts on November 1st.
Budget & DIY Hack: $. This is the cheapest high-impact idea here. A pack of black folders does thirty bats. Our pool noodle Halloween decor post has more of these cheap-material tricks.
5. The Vintage Apothecary Porch
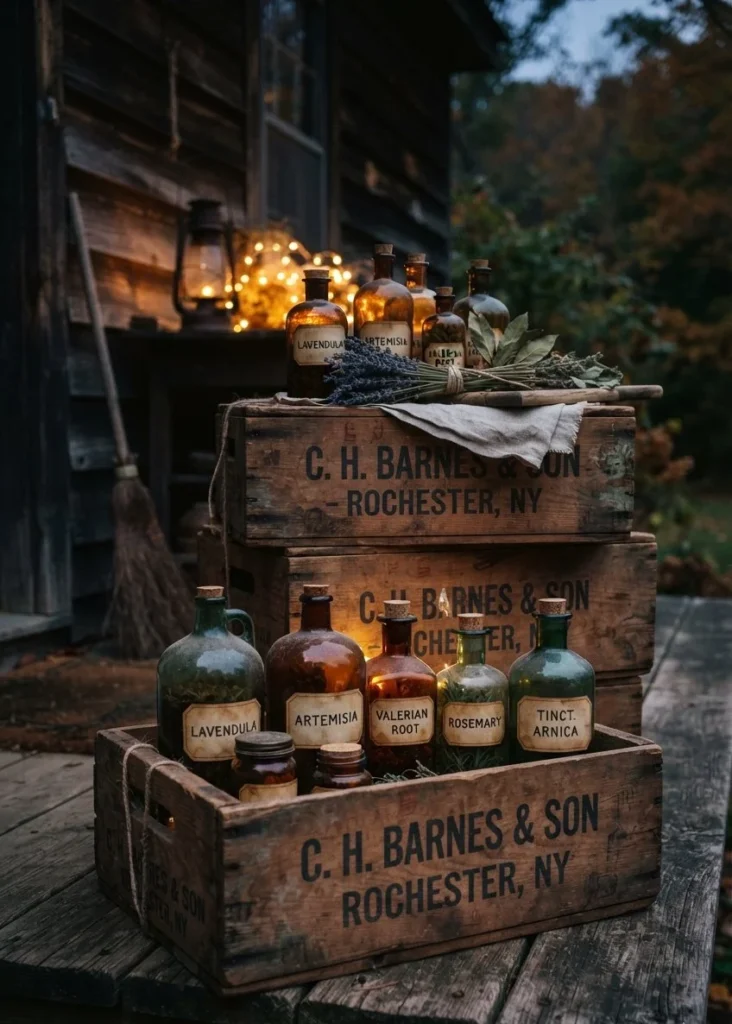
Feels like · A potion shop that closed in 1890
The Concept & Visual Anchor: Stacked wooden crates holding amber jugs, labeled bottles and bundles of dried lavender. Warm amber glass lit from behind is the focal point and it photographs beautifully at dusk.
Materials & Exact Hardware: Three wooden crates, amber glass jugs and bottles, tea-stained paper labels, dried lavender and bay bundles, twine, and battery fairy lights with a timer.
Styling & Pro-Tip: Stagger the crates so each one sits back slightly from the one below, creating depth. Laminate your labels or cover them in clear packing tape. Mine ran in the first rain and the ink bled down the bottles. Put the light strand behind the glass, never in front.
Budget & DIY Hack: $. Save kombucha and beer bottles and soak the labels off. The aged paper look here is the same one used in our primitive Halloween decor guide.
6. The Modern Chic Skeleton Lounge
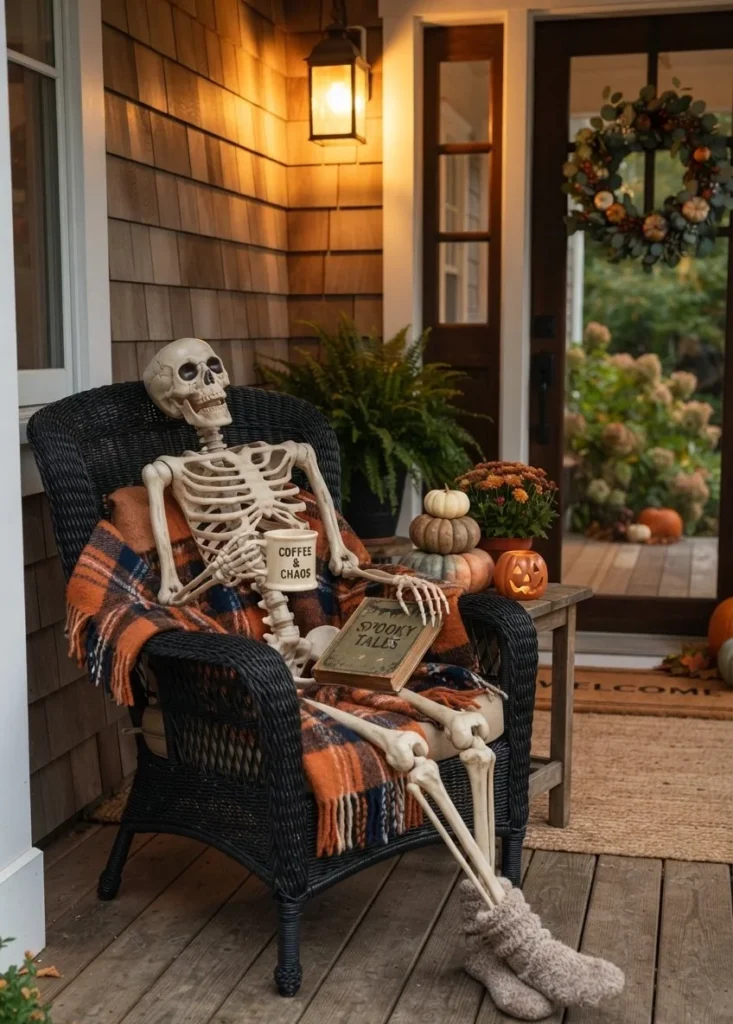
Feels like · He lives here now
The Concept & Visual Anchor: A life-size skeleton slouched in your porch chair with a wool blanket over his legs, a mug in one hand and a book in the other. It’s funny rather than frightening, which makes it the best option if small kids visit.
Materials & Exact Hardware: A posable plastic skeleton, a wool or plaid throw, an enamel mug, an old hardcover book, and black zip ties.
Styling & Pro-Tip: Zip tie his hips and one shoulder to the chair frame, low down where the blanket hides it. Cheap skeletons slide out of chairs constantly, and a gust will take one across the lawn. Cross the ankles and tilt the skull slightly. That small angle is what makes the pose look relaxed instead of propped.
Budget & DIY Hack: $$ to $$$. Skeletons go on deep discount in early November. Buy next year’s now and everything else here you already own.
7. Floating Acceptance Letters & Keys
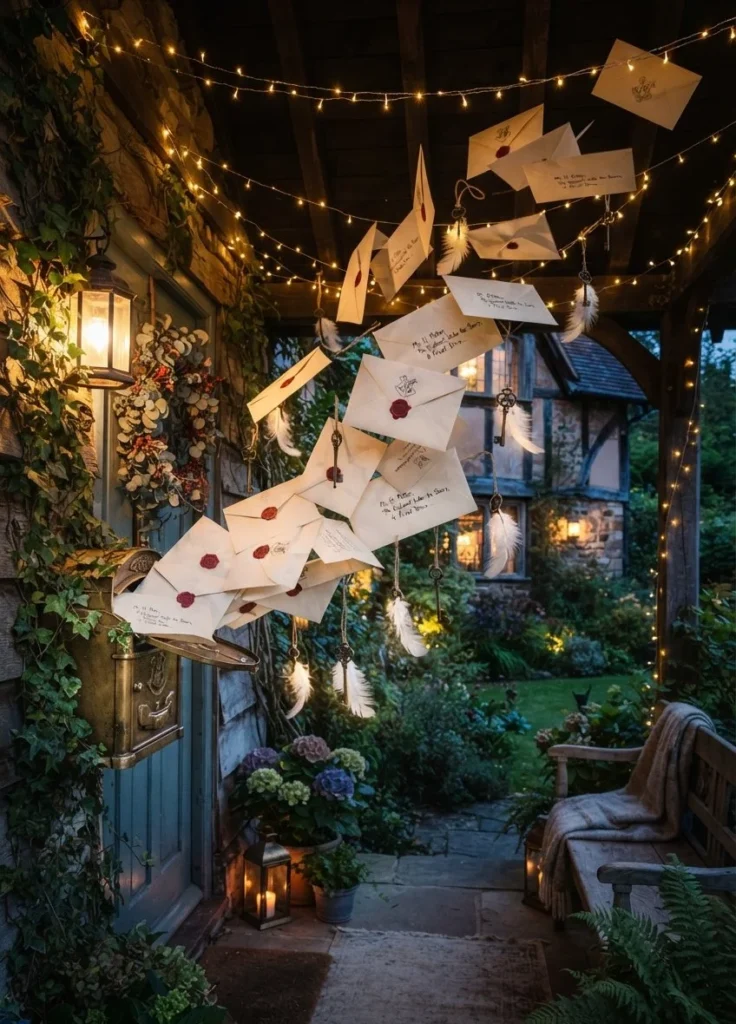
Feels like · The post finally arrived
The Concept & Visual Anchor: Cream envelopes with wax seals tumbling out of the letterbox and floating upward, with a few winged keys mixed in. Warm light behind the parchment makes the envelopes glow like they’re carrying something.
Materials & Exact Hardware: Cream cardstock envelopes, red wax seal stickers, small skeleton keys, white feathers, fishing line, and a warm LED strand.
Styling & Pro-Tip: Hang each envelope at a slightly different angle, some tilted forward, some sideways. Perfectly flat envelopes look pinned rather than floating. Seal each one with clear spray or packing tape before it goes up, because untreated cardstock goes limp in one damp night.
Budget & DIY Hack: $. Print addresses in a loopy font on plain paper and tea stain them. Hot glue two feathers to a cheap key for the winged version. More of this look lives in our Harry Potter theme Halloween decor post.
8. The Giant Wall-Crawler Spider
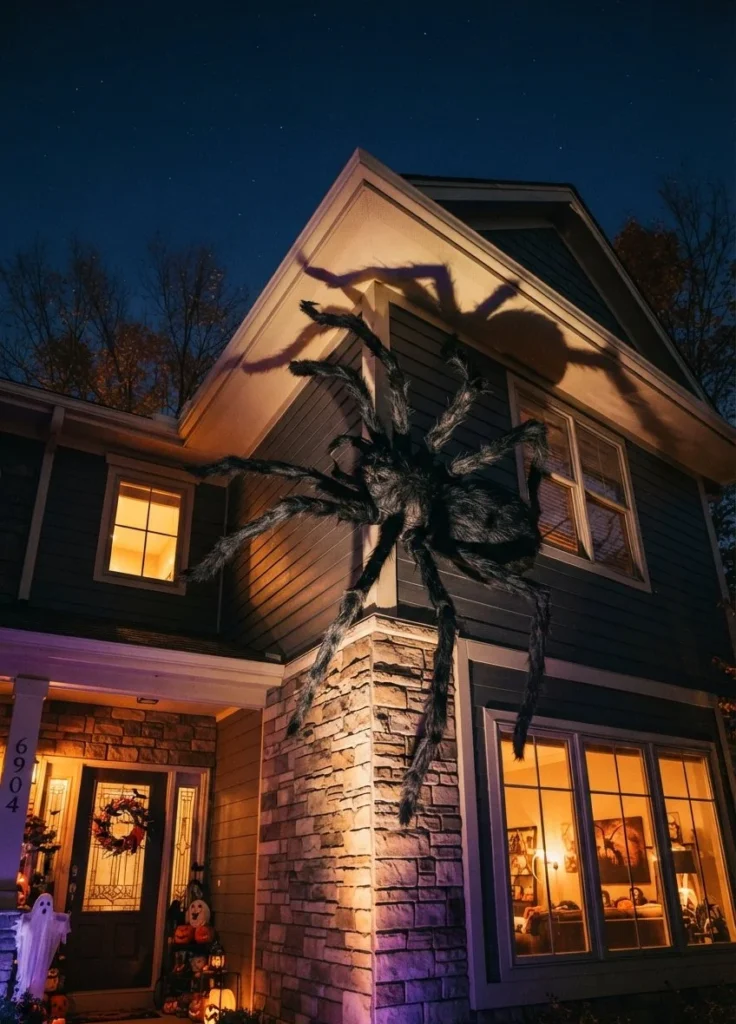
Feels like · Scale doing all the work
The Concept & Visual Anchor: One oversized spider crawling around the corner where two walls meet, legs bent over the edge. Wrapping the corner is what makes it look cinematic, because you see it in three dimensions from the street.
Materials & Exact Hardware: Four pool noodles, black duct tape, a black bin bag stuffed with newspaper, wire coat hangers, zip ties, and a purple LED spotlight.
Styling & Pro-Tip: Push a straightened coat hanger through each noodle before you bend the legs, so they hold their shape all month. Light it from below at an angle. Front lighting flattens it, uplighting throws leg shadows up the wall and doubles the size.
Budget & DIY Hack: $. Pool noodles go on clearance at the end of summer. Grab four then and you’ll spend almost nothing in October.
9. The Warm Amber Ghost Gathering
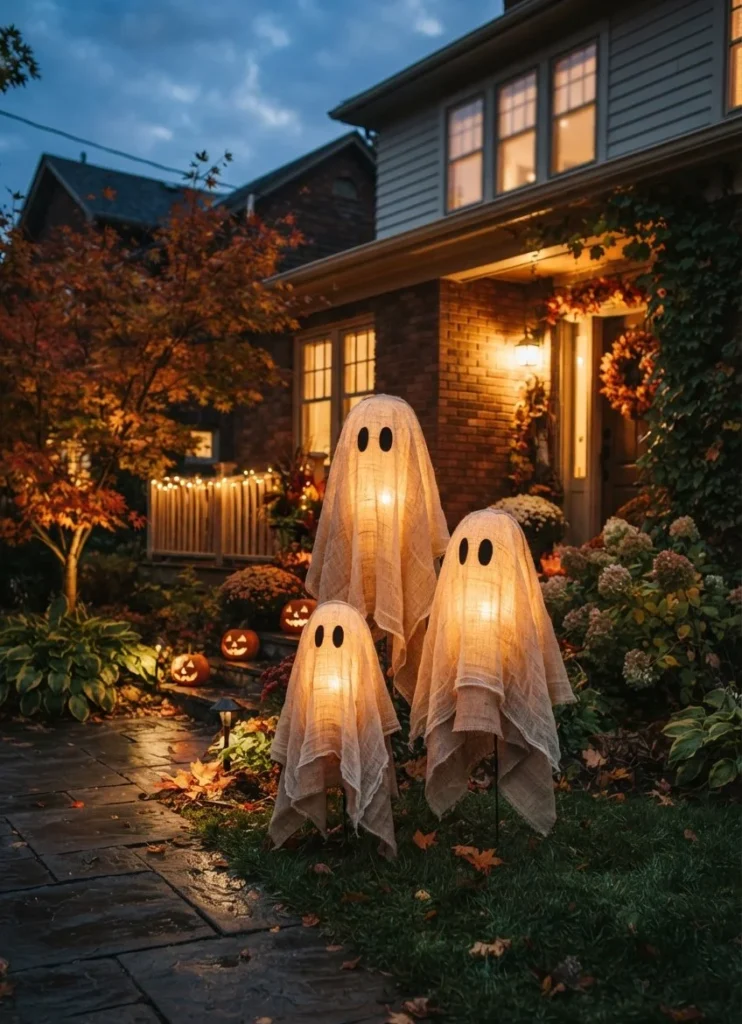
Feels like · Little glowing visitors on the lawn
The Concept & Visual Anchor: Gauze-wrapped lanterns on garden stakes at three different heights, glowing amber through the fabric. Soft and friendly by day, genuinely lovely once the timers kick in.
Materials & Exact Hardware: Garden stakes at varying heights, wire tomato cage tops or small round lanterns, cheesecloth or burlap, black felt for faces, and LED pillars on six hour timers.
Styling & Pro-Tip: Drive the stakes a good eight inches into the ground and angle the group slightly toward the walkway. Wrap the gauze loosely with gaps so light escapes in layers. A tightly wrapped ghost just looks like a covered lamp. Flameless only here, gauze catches instantly.
Budget & DIY Hack: $. An old white bedsheet torn into strips replaces the cheesecloth entirely and drapes better once it’s been washed a few times.
10. The Crow & Twig Archway
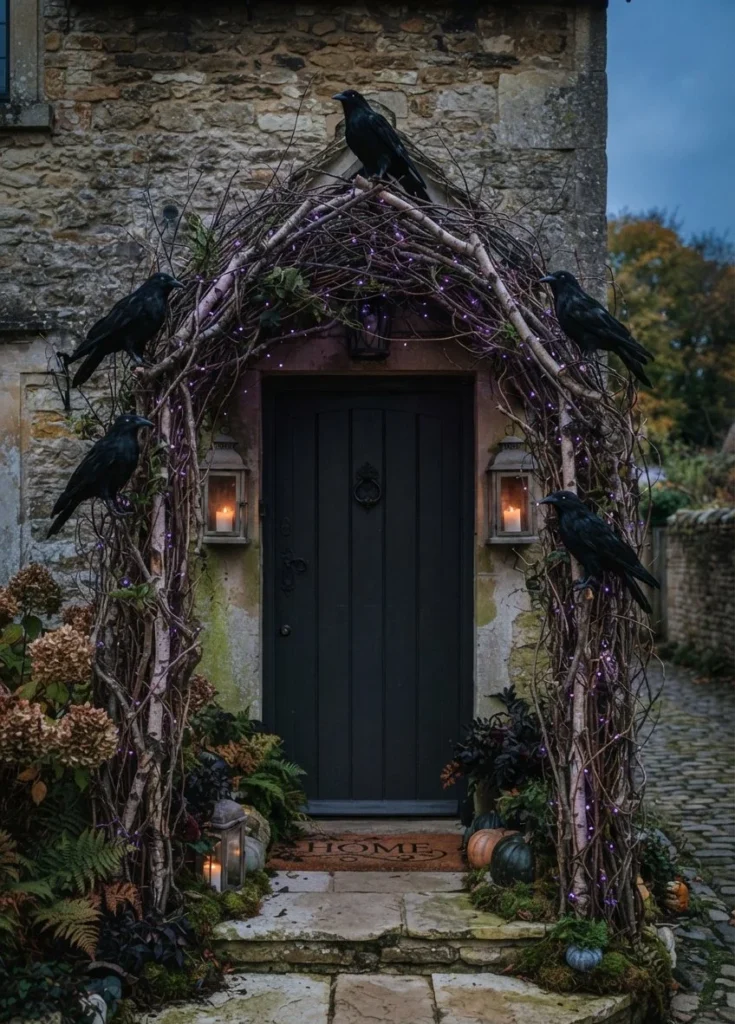
Feels like · A graveyard gate
The Concept & Visual Anchor: Bare foraged branches arching around the door frame with a few feathered crows perched at odd angles. Spiky natural silhouette against smooth siding, and it costs you a walk in the woods.
Materials & Exact Hardware: Foraged branches, floral wire, clear adhesive cord clips, four or five feathered crows, and purple micro lights on a timer.
Styling & Pro-Tip: Wire the branches into two long bundles first, then clip them to the trim over painter’s tape. Wire each crow’s feet directly to a branch. Loose ones blow off and end up two gardens away. Angle the birds differently so they look like they just landed.
Budget & DIY Hack: $. The branches are free. Crows are the only real cost and they store flat for years.
11. The Boho Autumn Hybrid
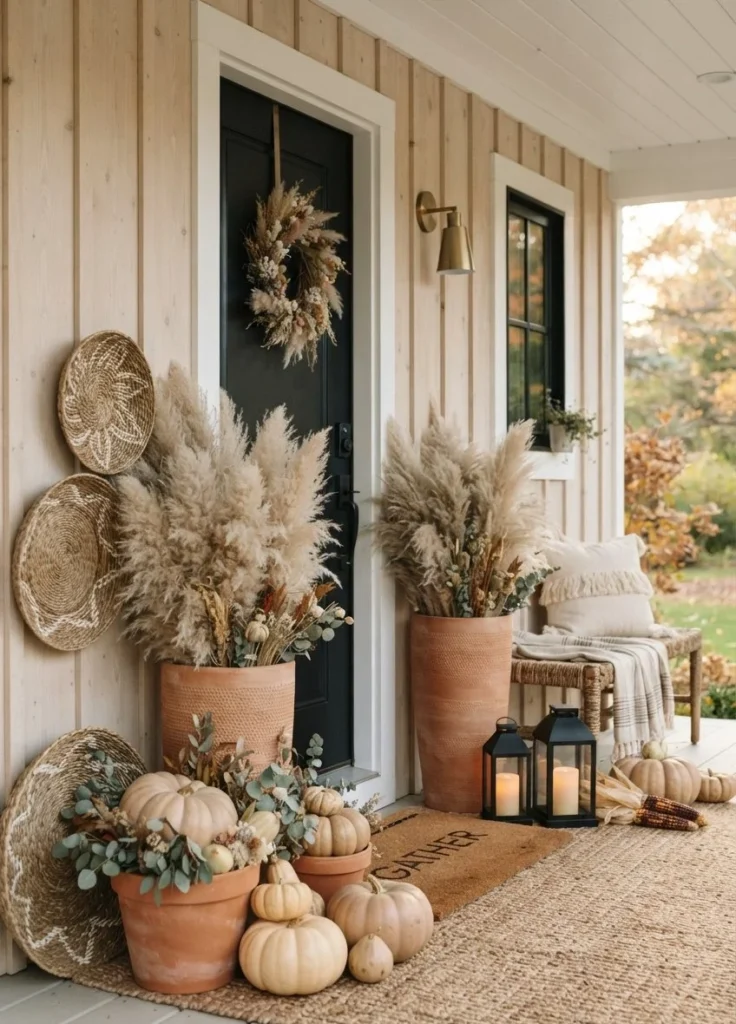
Feels like · One setup, two holidays
The Concept & Visual Anchor: Pampas grass, terracotta pots, white pumpkins and woven baskets in a warm neutral palette. Add two black lanterns for October, pull them out on the first of November and it becomes a Thanksgiving porch.
Materials & Exact Hardware: Pampas or dried palm, terracotta planters, white and tan pumpkins, a flat woven basket, and two black metal lanterns with LED pillars.
Styling & Pro-Tip: Give the pampas a light coat of cheap hairspray before it goes outside. It sheds everywhere otherwise and you’ll be picking fluff off the doormat for weeks. Weight the terracotta with gravel and keep everything within three tones of each other.
Budget & DIY Hack: $$. Plain nursery terracotta costs a fraction of decorative planters and ages beautifully outdoors.
12. The Boarded-Up Haunted Porch
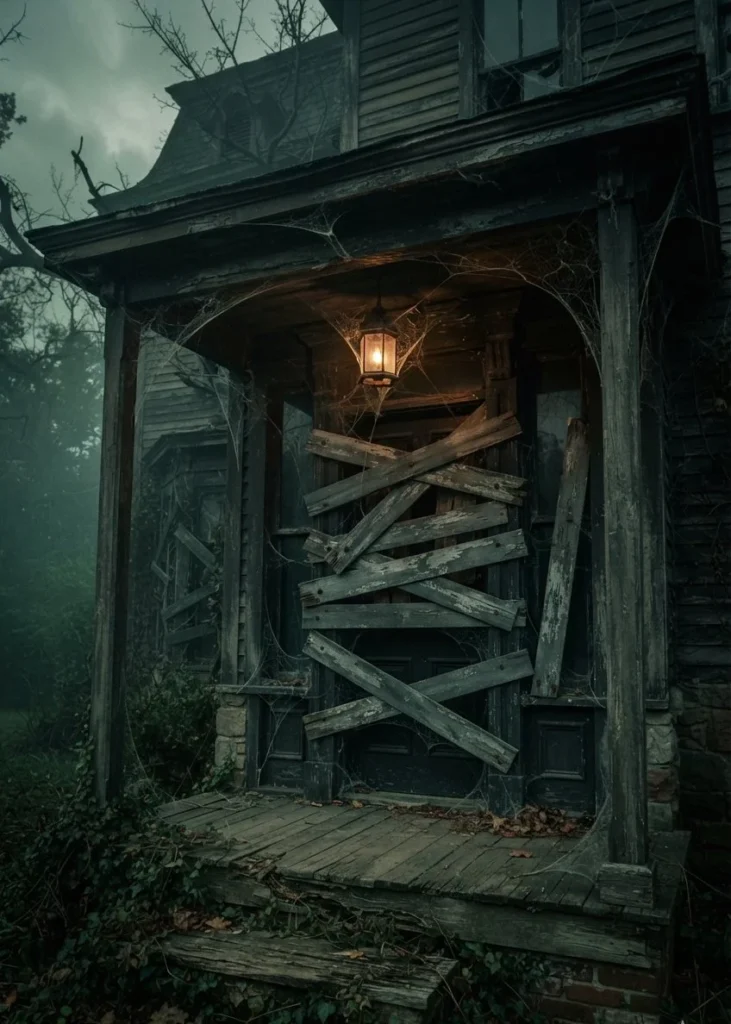
Feels like · Nobody has lived here in years
The Concept & Visual Anchor: Weathered planks crossed over the windows and one corner of the door, with cobwebs in the corners and a single dim bulb. The texture of grey weathered wood against clean siding is what sells the abandoned look.
Materials & Exact Hardware: Faux woodgrain foam boards, grey and brown craft paint, a dry brush, outdoor command strips, and painter’s tape.
Styling & Pro-Tip: Use foam boards, not real timber. Real planks are heavy enough to damage siding and dangerous if one lets go in wind. Dry brush grey over brown and drag the brush lengthwise for grain. Leave the actual door and handle completely clear.
Budget & DIY Hack: $. Flattened cardboard boxes painted the same way look identical from the street, and you can recycle them on November 1st.
13. The Lantern & Spanish Moss Runway
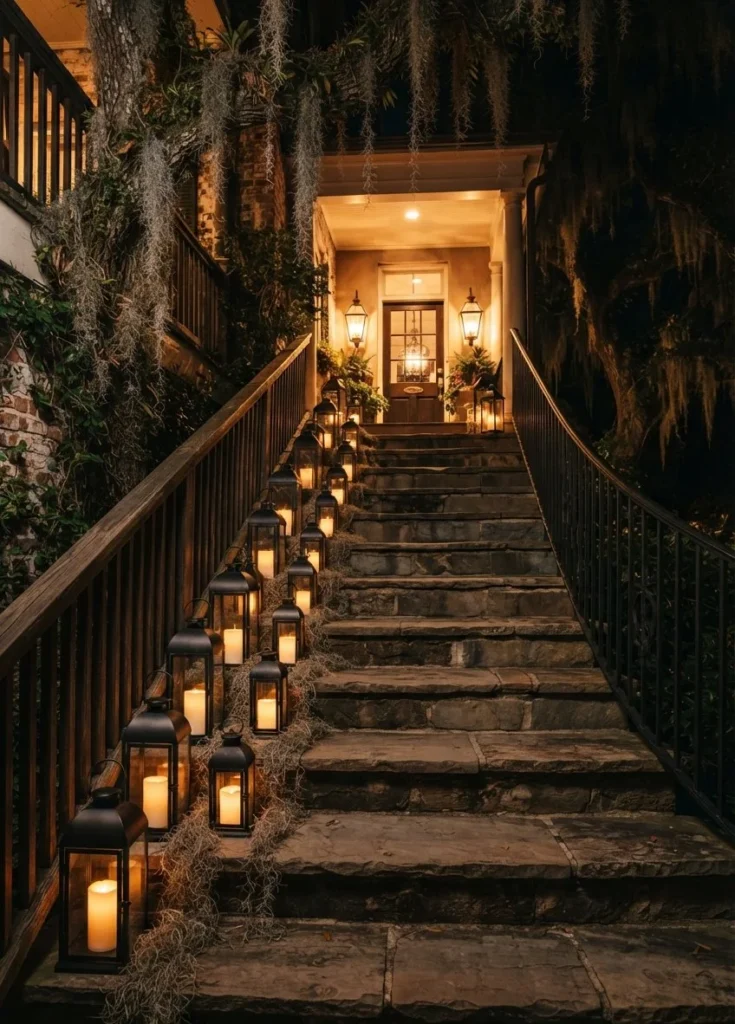
Feels like · A path you’re meant to follow
The Concept & Visual Anchor: Black lanterns in three sizes running up one edge of the steps, with Spanish moss trailing between them. Repetition with varied height is the whole effect, and it’s the most elegant setup on this list.
Materials & Exact Hardware: Five to seven black lanterns in mixed heights, LED pillars with six hour timers, Spanish moss, and clear silicone bumpers.
Styling & Pro-Tip: Alternate tall, short, tall as you go up rather than ordering them by size. Sync every timer on the same evening so they all come on together. Bumpers under each base stop them sliding on wet steps, and keep the opposite side of every tread clear for walking.
Budget & DIY Hack: $$. Thrift shops are full of mismatched lanterns. Spray them all matte black and they instantly look like a set.
The Night the Porch Blew Away
I heard from someone who spent a full Saturday on her porch, then woke up to find her lightweight planters on their sides, a garland in the hedge and two foam tombstones in the road. Nothing had been anchored, it had just been placed.
The fix: gravel in the bottom of every planter, zip ties on anything with legs, garden stakes through anything lightweight, and silicone bumpers under whatever sits on steps. Twenty minutes of anchoring saves the whole display.
The Wind & Rain Cheat Sheet
Run through this before you call the porch finished.
Swipe the table sideways to see every column.
| Item Type | The Real Threat | The Practical Fix |
|---|---|---|
| Tall planters & urns | Tipping in wind | Fill the bottom third with gravel before adding foam |
| Real pumpkins | Rot, fruit flies, rolling | Peppermint oil spray plus silicone bumpers underneath |
| Paper & cardstock | Curling and ink bleed | Swap to plastic folders, or seal with clear packing tape |
| Skeletons & figures | Sliding and blowing over | Zip tie hips and one shoulder to the chair frame |
| Hanging hats & ghosts | Spinning and tangling | Glue a metal washer inside the brim or base |
| Battery packs | Moisture killing the lights | Seal in a zip bag and tuck it under a planter rim |
| Cotton spiderweb | Turns grey and traps birds | Use chenille or rope webbing instead |
Real vs Faux Pumpkins, Honestly
Real pumpkins win on looks. That chalky, irregular skin absorbs light in a way moulded foam never manages, and heirloom varieties come in colours nobody manufactures well. Cost is low, especially late in the season, but a real pumpkin on a warm porch gives you roughly three to six weeks before soft spots appear. Wash each one in a weak bleach solution, dry it, then spray the outside with water and a few drops of peppermint oil every week. It keeps flies off and slows the rot noticeably.
Faux wins on storage and repeat value. Buy a few good matte ones, never gloss, and you’ll reuse them for a decade. My own approach is a mix. Faux for the big anchor pieces that sit in the same spot every year, real for the small gourds scattered around them. You get the texture where it shows most and you’re not replacing a whole display every autumn.
Questions I Get Every October
When should outdoor Halloween decor go up?
The first week of October is the sweet spot. Go up earlier and your real pumpkins will be collapsing before the 31st, and anything paper or fabric has an extra fortnight of weather to survive.
How do I stop real pumpkins rotting and attracting fruit flies?
Wipe each pumpkin with a diluted bleach solution, dry it fully, then mist weekly with water and a few drops of peppermint oil. Keep them off direct soil and out of afternoon sun, since heat and damp underneath are what start the soft spots.
What’s the safest way to light porch stairs?
Put battery lanterns on the outer edge of each tread and keep the middle walking lane completely clear. Avoid trailing cords across steps entirely, and choose warm 2700K light so people can actually see the edge of each stair.
How do I stick bats to brick without damaging the mortar?
Adhesive doesn’t grip brick well and pulling it off can take mortar with it, so use brick clips that hook onto the lip of the brick instead. On smooth painted siding, put blue painter’s tape down first and stick your mounting squares on top of the tape.
You don’t need all thirteen. Pick the one that suits your porch size, anchor everything properly, put one warm 2700K bulb where the light matters most, and stop there.
Then walk down to the end of your driveway at dusk and look back. That’s the view everyone else gets, and it’ll tell you in about five seconds whether anything still needs adjusting.