18 Sturdy DIY Outdoor Christmas Decorations for the Yard with Massive Curb Appeal
There’s a special kind of pride in pulling into your driveway on a December night and seeing something you built yourself glowing on the lawn. Not a $40 plastic kit from the seasonal aisle. Something with real wood, real weight and a few sawdust stories behind it.
The trouble is that most homemade yard decor doesn’t make it to Christmas. The first windy night sends a plywood reindeer cartwheeling into the neighbor’s hedge. Rain swells the edges.
And the cute little sign that looked great on the workbench turns out to be invisible from the street.
Three things fix almost all of it. Anchor everything properly with rebar, stakes or cables. Seal every surface and screw hole with exterior-grade finishes like spar urethane and silicone. And build big, then light it smart, because your audience is standing 20 to 30 feet away.
So here are 18 DIY outdoor Christmas yard decorations that I’d trust through a real winter, each with the build steps, the anchoring method and the weatherproofing trick that keeps it standing.
Build 3 feet or taller
Anything shorter disappears from the sidewalk.
Group in odd numbers
Three or five pieces read as one strong display.
Test from the curb
Walk to the road at night before you finish placing anything.
The Winter Weather Survival Quick Matrix
Swipe sideways on mobile to see the full table.
| Project Category | Best Raw Material | Wind-Anchoring Method | Weatherproofing Finish |
|---|---|---|---|
| Large Plywood Cutouts | 1/2 inch exterior CDX or MDO plywood | Two 24 inch rebar stakes with conduit straps | Exterior primer, paint and spar urethane |
| Lightweight PVC / Wire Structures | Schedule 40 PVC, tomato cages, chicken wire | PVC slid over rebar, tent stakes and guy lines | UV-resistant spray paint and outdoor zip ties |
| Masonry / Timber Builds | Concrete urns, pressure-treated lumber | Their own weight plus a gravel-filled base | Exterior stain or deck sealer |
| Lighted Yard Spheres | Chicken wire over a frame | Landscape staples through the bottom ring | Outdoor-rated LED lights and sealed plug covers |
18 DIY Outdoor Christmas Yard Decorations
1. Giant Inverted Tomato-Cage Evergreen Trees in Fairy Lights
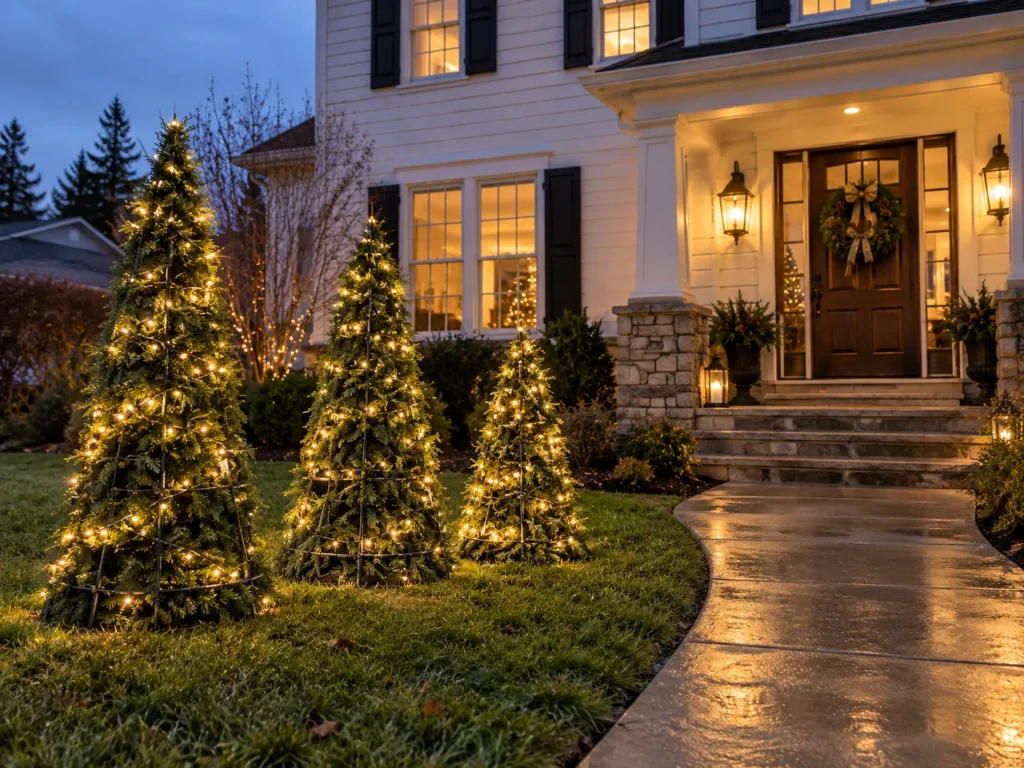
Feels like · glowing front-yard forest
The Street View and Curb Appeal: By day, a trio of neat green cones lines the walkway like little topiaries. At night they turn into a glowing mini forest that you can spot from the end of the block.
Hardware and Materials to Gather:
- Three heavy-gauge tomato cages in 42, 54 and 66 inch sizes
- Faux pine garland or green outdoor deco mesh
- Outdoor-rated 2700K warm LED fairy lights
- 12 inch landscape staples and UV-resistant zip ties
The Construction and Anchoring Step: Flip each cage upside down and zip-tie the prongs together at the top. Wrap the lights from the bottom ring up, then wind garland over the lights and tie it every 8 inches. Drive three landscape staples over the wide bottom ring so it can’t lift or roll in gusts.
Real-World Weatherproofing Hack: Tuck the light plug into a weatherproof cord connector box and leave a drip loop in the cord before it reaches the outlet, so water runs off the low point instead of into the connection.
2. Lighted Chicken-Wire Snowball Spheres on the Lawn
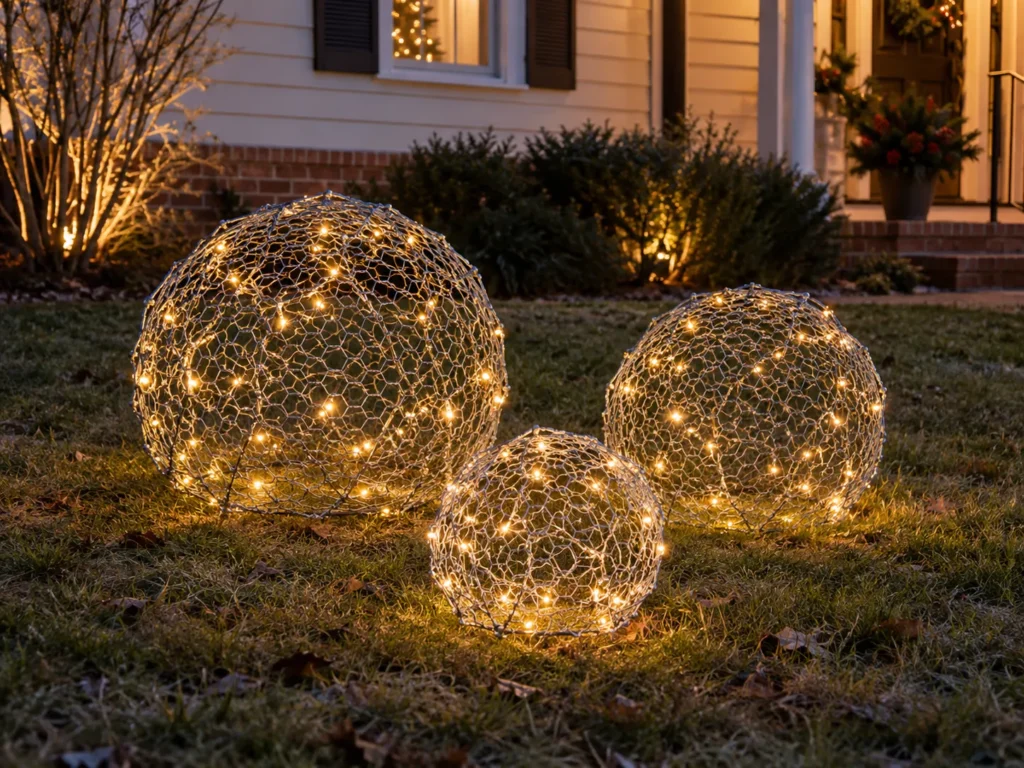
Feels like · giant glowing snowfall
The Street View and Curb Appeal: Big white wire orbs scattered across the grass look like oversized snowballs during the day. After dark they glow like moons that rolled into your yard.
Hardware and Materials to Gather:
- A roll of 1 inch galvanized chicken wire
- Cool or warm white outdoor LED mini lights, 100 count per sphere
- Work gloves and tin snips
- 6 inch landscape staples
The Construction and Anchoring Step: Cut a 6 foot length of chicken wire, roll it into a tube, then crush and fold both ends inward into a rough ball. Push the lights inside through the gaps, spreading them around the interior. Set each ball on a flattened spot and pin it with two staples through the bottom so wind can’t roll it down the slope.
Real-World Weatherproofing Hack: Make three balls in different sizes for a natural cluster, and connect them end to end so you only run one cord to the house. Galvanized wire won’t rust through a single winter.
3. Plywood Silhouette Reindeer Family Sealed With Marine Varnish
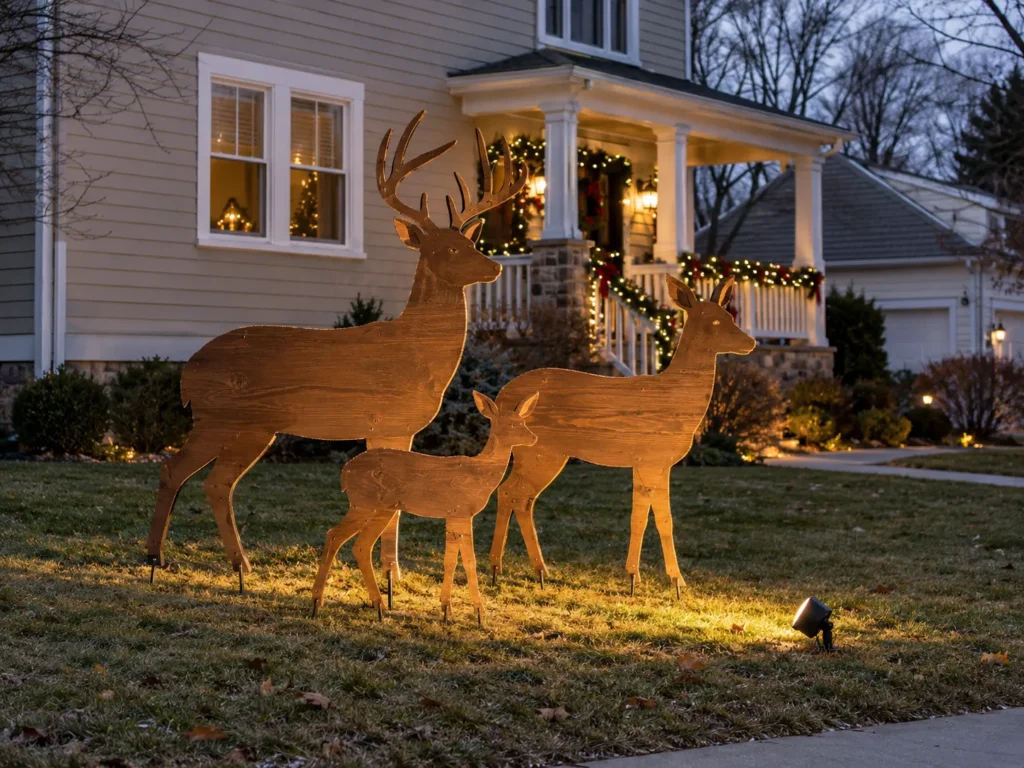
Feels like · reindeer grazing at dusk
The Street View and Curb Appeal: Three crisp silhouettes, a buck, a doe and a fawn, stand together on the lawn looking almost lifelike from the road. With a floodlight washing over them at night, they cast long dramatic shadows.
Hardware and Materials to Gather:
- Two sheets of 1/2 inch exterior CDX or MDO plywood
- Exterior primer and paint, plus spar urethane or marine varnish
- Two 24 inch rebar stakes per reindeer
- 1/2 inch conduit straps and exterior screws
The Construction and Anchoring Step: Trace the shapes, cut with a jigsaw and sand all the edges. Screw two conduit straps to the back of each piece, one behind the front legs and one behind the back legs. Drive the rebar 12 inches into the ground, then slide the straps down over the bars so the cutout can’t twist or tip.
Real-World Weatherproofing Hack: Plywood edges soak up water fastest. Brush three coats of spar urethane on every cut edge, not just the faces, and keep the bottom of the legs an inch above the grass so they never sit in wet sod.
4. PVC Driveway Candy Cane Bollards on Steel Rebar
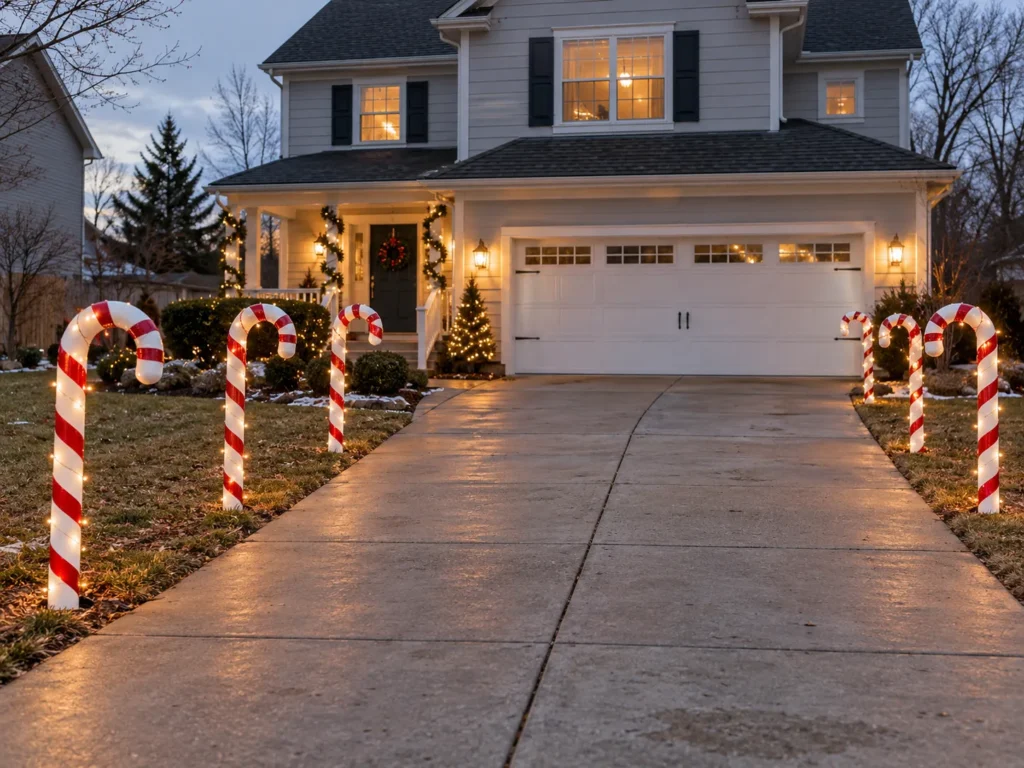
Feels like · candy lane welcome
The Street View and Curb Appeal: Tall red and white striped canes march up both sides of the driveway, bold enough to read from a car window. Wrapped in lights, they guide guests right to the door at night.
Hardware and Materials to Gather:
- 2 inch schedule 40 PVC pipe and 90 degree or 45 degree elbows
- White PVC-bonding spray paint and red outdoor vinyl tape
- 24 inch rebar stakes, one per cane
- Red outdoor LED rope light, optional
The Construction and Anchoring Step: Cut 4 foot sections, glue a pair of 45 degree elbows plus a short piece on top to form the hook, and paint them white. Wrap red vinyl tape in a diagonal spiral. Hammer rebar 12 to 14 inches into the ground and slide each cane over it, so the steel does the work of holding it upright.
Real-World Weatherproofing Hack: Drive your rebar before the ground freezes hard. Leave the stakes in place all season, and mark them with a flag after you pull the canes so nobody trips or mows over them.
5. Reclaimed Pallet Christmas Tree With Drilled-In C9 Sockets
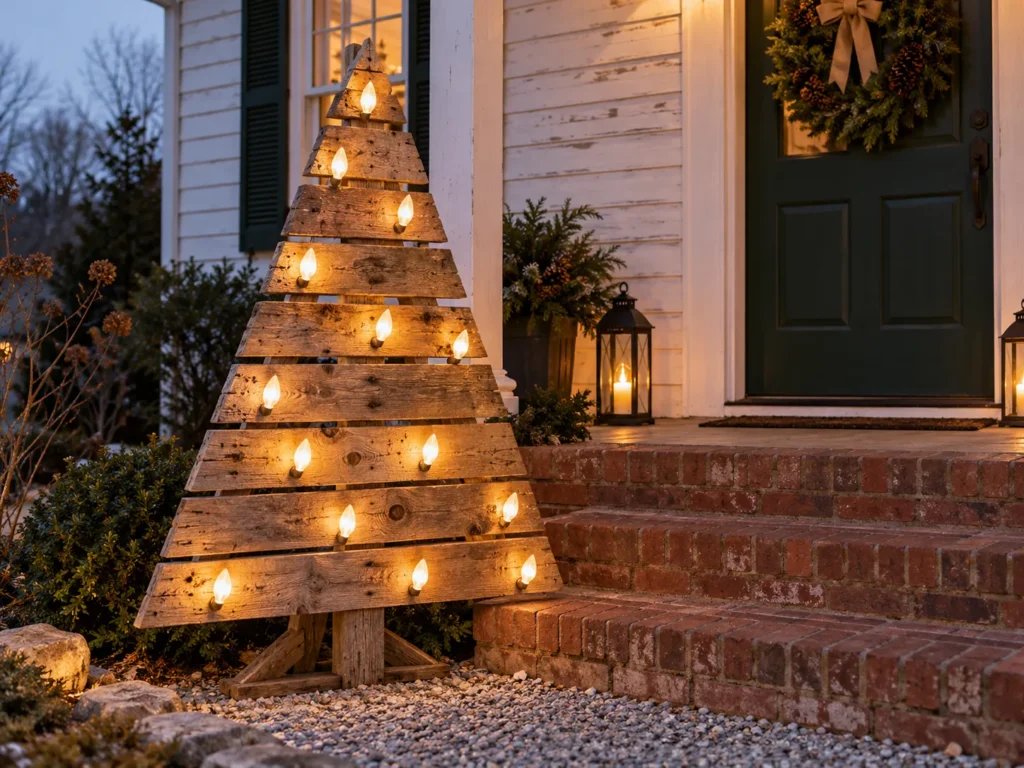
Feels like · rustic farmhouse glow
The Street View and Curb Appeal: A flat, tiered wooden tree made from weathered pallet boards leans against the porch or stands on the lawn. Big glowing C9 bulbs poke right through the wood at night, like a vintage marquee.
Hardware and Materials to Gather:
- One or two heat-treated pallets, stamped HT
- Outdoor C9 LED light string with sockets
- A 1 inch spade bit and drill
- Two 2 by 4 back braces and exterior screws
The Construction and Anchoring Step: Cut boards into a stepped tree shape and screw them to two vertical 2 by 4s. Drill holes at random spots and push each C9 socket in from the back, so the bulb sits through the front. Add a hinged 2 by 4 kickstand on the back, then stake the foot of the kickstand into the lawn with a tent stake.
Real-World Weatherproofing Hack: Only use pallets stamped HT, never MB, which means they were treated with chemicals. Run a bead of clear exterior silicone around each socket hole so rain can’t drip down to the wiring.
A neighbor of mine built a gorgeous plywood Santa sleigh one year, painted it beautifully and stood it up with nothing but a couple of short garden stakes. The first real storm caught it like a sail. We found it the next morning flat across his driveway, one runner snapped clean off.
The fix: Big flat cutouts need at least two 24 inch rebar stakes driven a foot deep, or a guy line tied back to a stake behind them. Garden stakes are for tomatoes.
6. Mason Jar Pathway Stakes With Pea Gravel and Solar LEDs
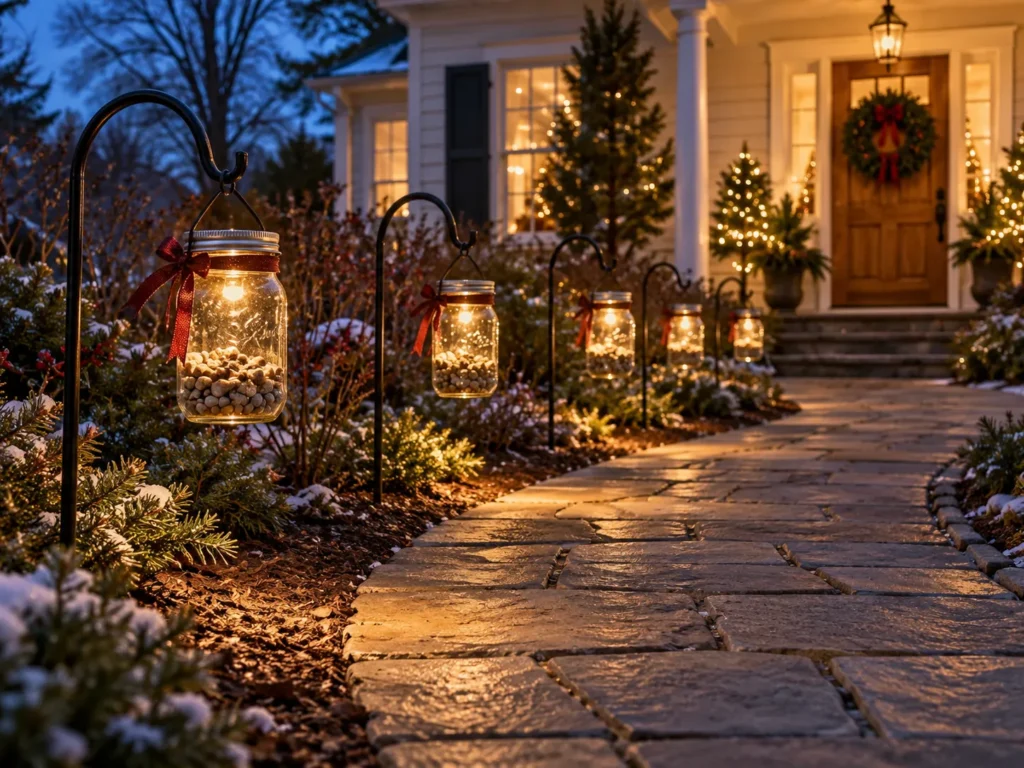
Feels like · lantern-lit country lane
The Street View and Curb Appeal: A neat row of glass jars on stakes lines the front walk, each one tied with a red bow. At night they glow softly in a line that draws the eye from the sidewalk straight to the door.
Hardware and Materials to Gather:
- Quart mason jars
- Solar jar-lid LED lights
- Pea gravel
- 3 foot shepherd’s hooks or 1/2 inch rebar with hose clamps
The Construction and Anchoring Step: Pour 2 inches of pea gravel into each jar so it’s bottom-heavy and won’t swing in the wind. Screw on the solar lid. Hang from shepherd’s hooks pushed 10 inches into the ground, or clamp each jar to a rebar stake with a stainless hose clamp.
Real-World Weatherproofing Hack: Drill two tiny holes in the bottom of each jar so rainwater drains instead of pooling and freezing, which can crack the glass. Space them about 6 feet apart so the line reads clearly from the street. A few spare jars grouped on a porch bench tray look lovely too, the same low layering I use in my fall tray decor ideas.
7. Oversized 1×4 Farmhouse Lantern Posts With Burlap Cedar Bows
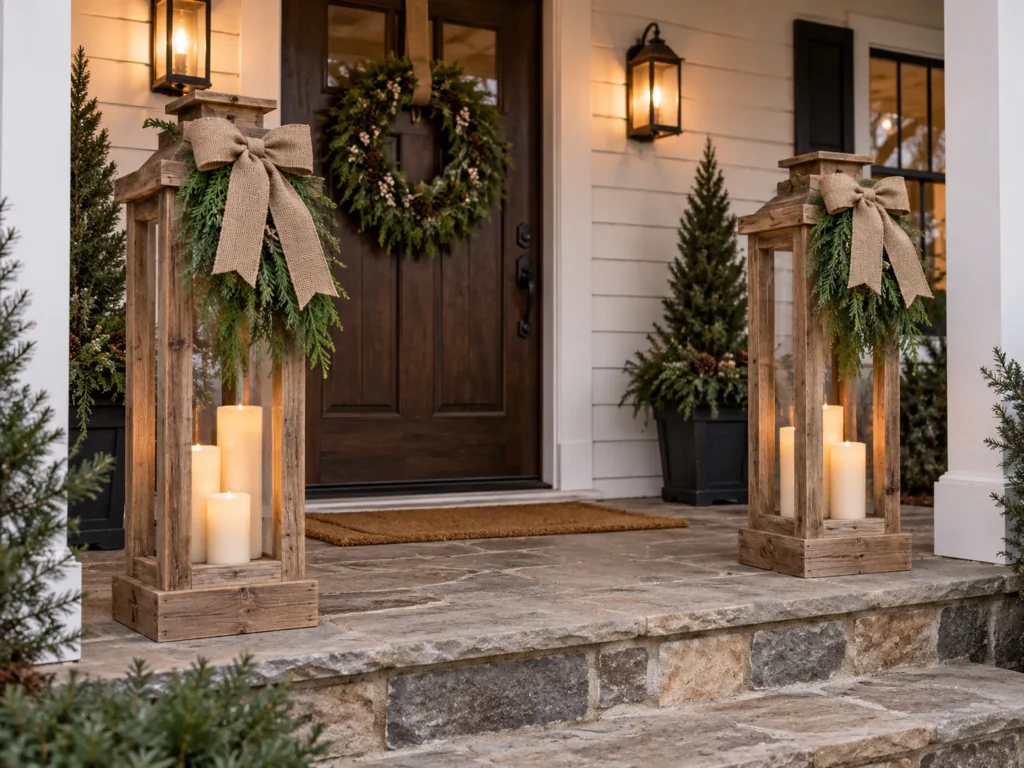
Feels like · old inn entrance
The Street View and Curb Appeal: Two tall open-frame wooden lanterns flank the front steps, each with a lit candle cluster inside and a cedar bow on top. They make even a plain entry look like a country inn.
Hardware and Materials to Gather:
- 1×4 pressure-treated or cedar boards
- A 12 by 12 inch plywood base and top cap
- Flameless outdoor pillar candles with timers
- Faux cedar bows and wired burlap ribbon
The Construction and Anchoring Step: Build a 4 foot tall open box from four 1×4 corner posts screwed to the base and cap, with two horizontal rails per side. Add a 10 pound bag of gravel or a paver inside on the base, and if they’re on a lawn, screw an L-bracket to each corner and stake it down.
Real-World Weatherproofing Hack: Use exterior deck screws, which won’t rust and streak your paint. Swap the burlap bow for a fresh one if it soaks through, since wet burlap gets heavy and droops. The same lantern-and-bow look carries over nicely from fall, like the greenery styling in my Thanksgiving mantel decor ideas.
8. Giant Lawn Ornaments From Bouncy Balls and Pie Pans

Feels like · fallen giant’s tree
The Street View and Curb Appeal: Huge shiny ornaments, complete with metallic caps, sit scattered under a tree as if they fell off a giant’s Christmas tree. They catch sunlight by day and reflect porch lights at night.
Hardware and Materials to Gather:
- Large rubber playground balls, 16 to 24 inches
- Small metal pie pans or aluminum tart tins for caps
- Plastic-bonding metallic spray paint
- Outdoor construction adhesive and thick rope
The Construction and Anchoring Step: Spray each ball with two light coats of metallic paint. Glue an upside-down pie pan on top with construction adhesive, then glue a rope loop into the center. To keep them from rolling, set each ball in a shallow ring of mulch or tie the rope loop down to a tent stake hidden behind it.
Real-World Weatherproofing Hack: Let the ball deflate slightly before painting and reinflate after, so the paint has a little give and doesn’t crack in the cold. Skip hot glue entirely here, because it turns brittle and pops off when it freezes.
9. Birch Log Tepee With Jute Rope and Warm Micro Lights
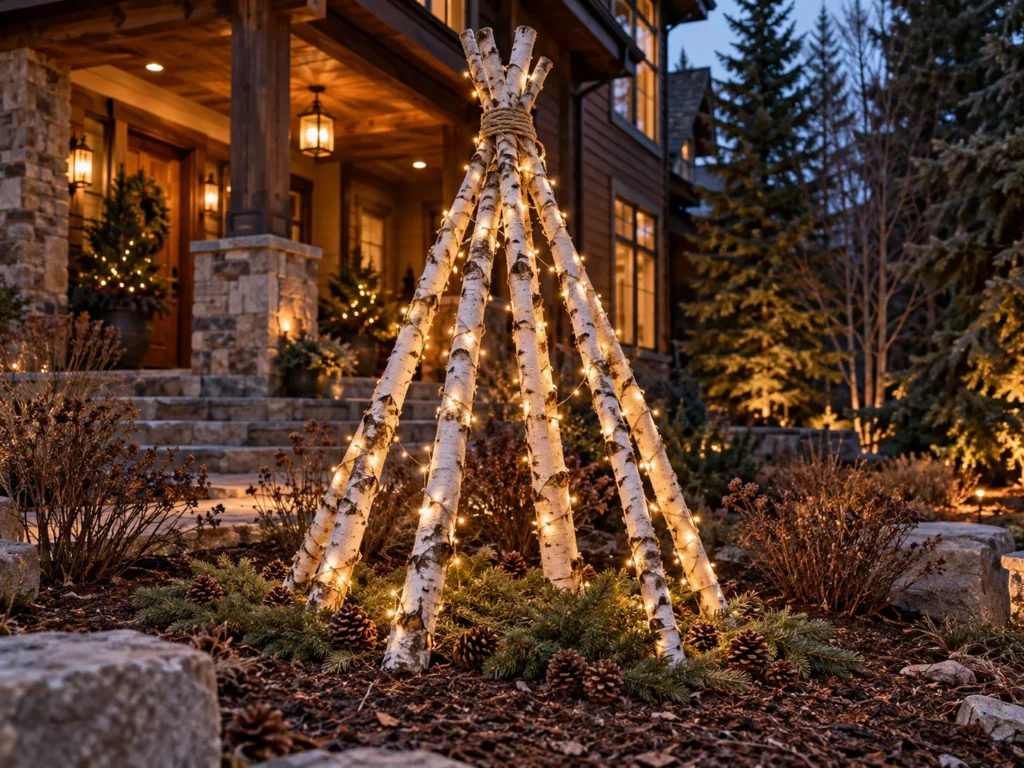
Feels like · woodland campfire
The Street View and Curb Appeal: A tall cone of white birch poles tied with chunky jute rope stands in a front garden bed. Micro lights wound through it make it glow like a lantern in the snow.
Hardware and Materials to Gather:
- 5 to 7 birch poles, 5 to 6 feet tall
- 3/4 inch natural jute rope
- Warm white outdoor micro LED lights
- Short rebar pieces for each pole
The Construction and Anchoring Step: Push or hammer a 12 inch rebar piece into the ground at each pole position in a circle. Drill a hole up into the bottom of each birch pole and set it over its rebar. Lean the tops together and lash them with jute in a tight figure-eight, then wrap lights from top to bottom.
Real-World Weatherproofing Hack: Seal the cut ends of the birch with a clear exterior sealer so they don’t soak up water and split. Birch logs also look great stacked by the fireplace once they come inside, the way I style them in my fall living room decor ideas.
10. Geometric Wooden Lath Stars Hung Between Lawn Trees
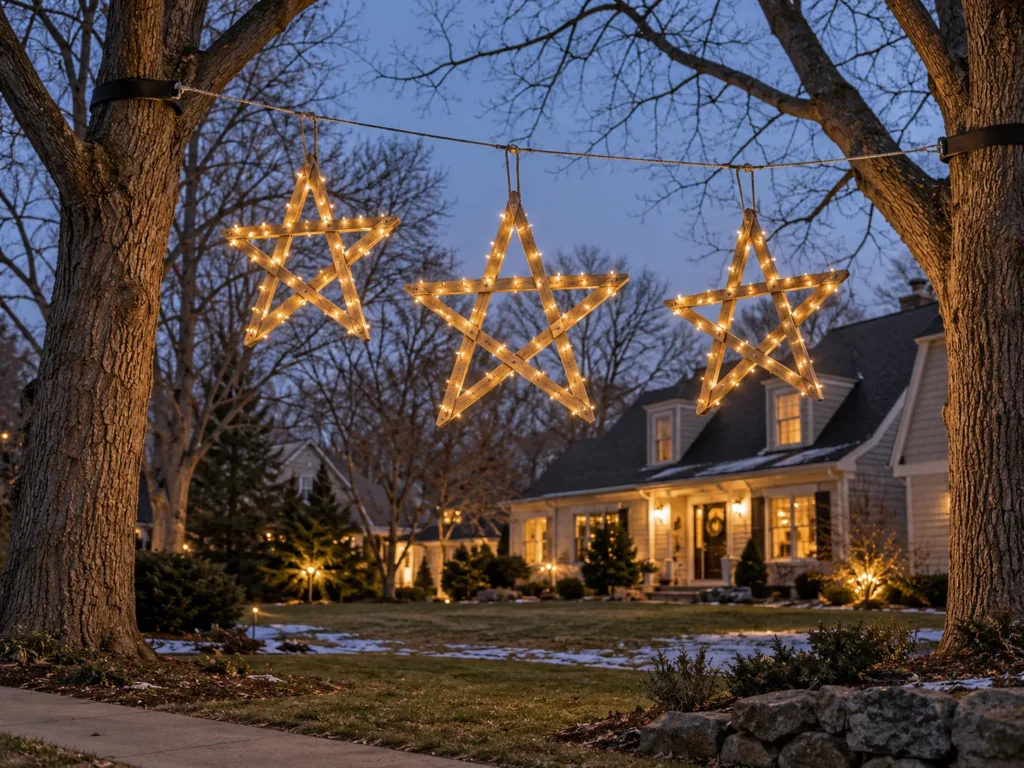
Feels like · stars caught in the branches
The Street View and Curb Appeal: Big wooden stars wrapped in lights float in the air between two trees, high enough to see over cars and hedges. At night they look like they’re hovering over the yard.
Hardware and Materials to Gather:
- Wooden lath strips, 4 feet long
- Exterior wood glue and brad nails
- Warm white outdoor LED string lights
- 1/8 inch stainless steel cable and turnbuckles
The Construction and Anchoring Step: Arrange five lath strips into a star, glue and nail every crossing point. Wrap lights tightly along each strip. Run a stainless cable between two sturdy trees using tree-friendly straps, tension it with a turnbuckle and hang each star from the cable with two short ties so it can’t spin wildly in the wind.
Real-World Weatherproofing Hack: Use wide fabric tree straps, never wire wrapped directly around the trunk, which damages bark. Hang stars at least 8 feet up so they clear heads and look best from the road.
11. Painted Plywood North Pole Directional Post on Iron U-Stakes
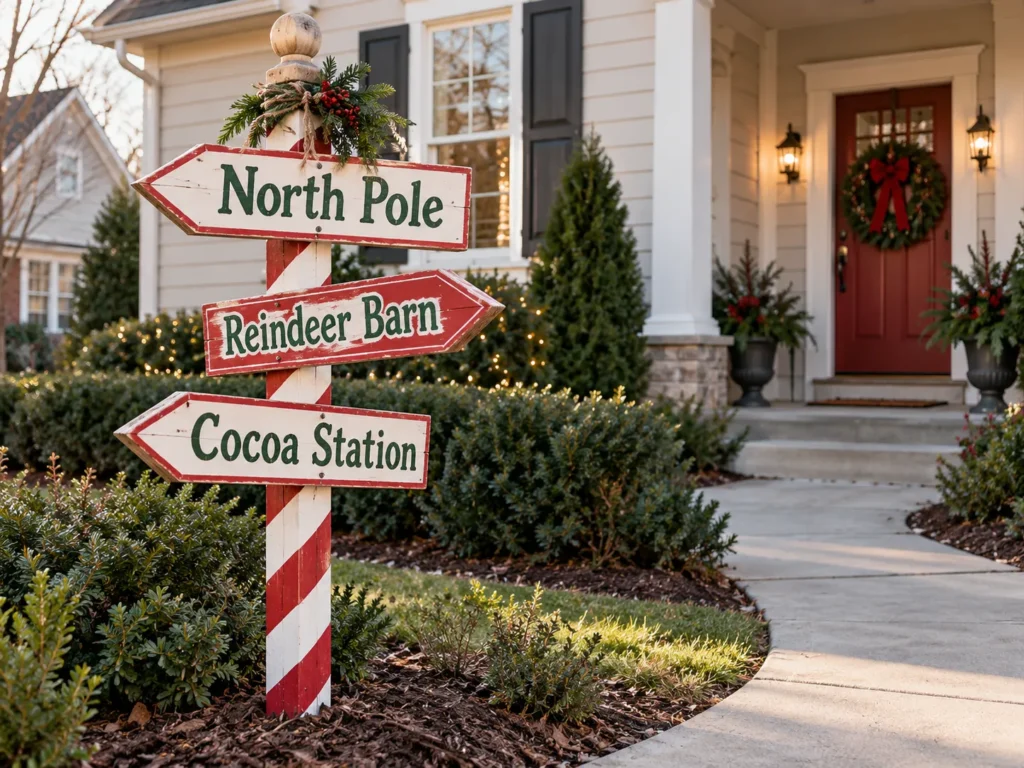
Feels like · this way to Santa
The Street View and Curb Appeal: A tall striped post with arrows pointing to the North Pole, the Reindeer Barn and Cocoa Station stands near the walk. Kids spot it from the car and want to read every sign.
Hardware and Materials to Gather:
- A 4×4 pressure-treated post, 6 feet
- 1/2 inch exterior plywood for arrows
- Outdoor acrylic paint and spar urethane
- A metal post spike or four heavy iron U-stakes
The Construction and Anchoring Step: Paint the post in red and white stripes and cut arrow signs from plywood. Letter them with 4 inch tall paint so they read from 25 feet away, then screw them on at different angles. Hammer a metal post spike into the ground and drop the post in, or attach two short 2×4 feet and pin them with U-stakes.
Real-World Weatherproofing Hack: Dab clear exterior silicone over each screw head before painting the final coat so water can’t creep into the plywood around the screws.
12. Galvanized Wash Tub Porch Hearth With Split Logs and Spruce
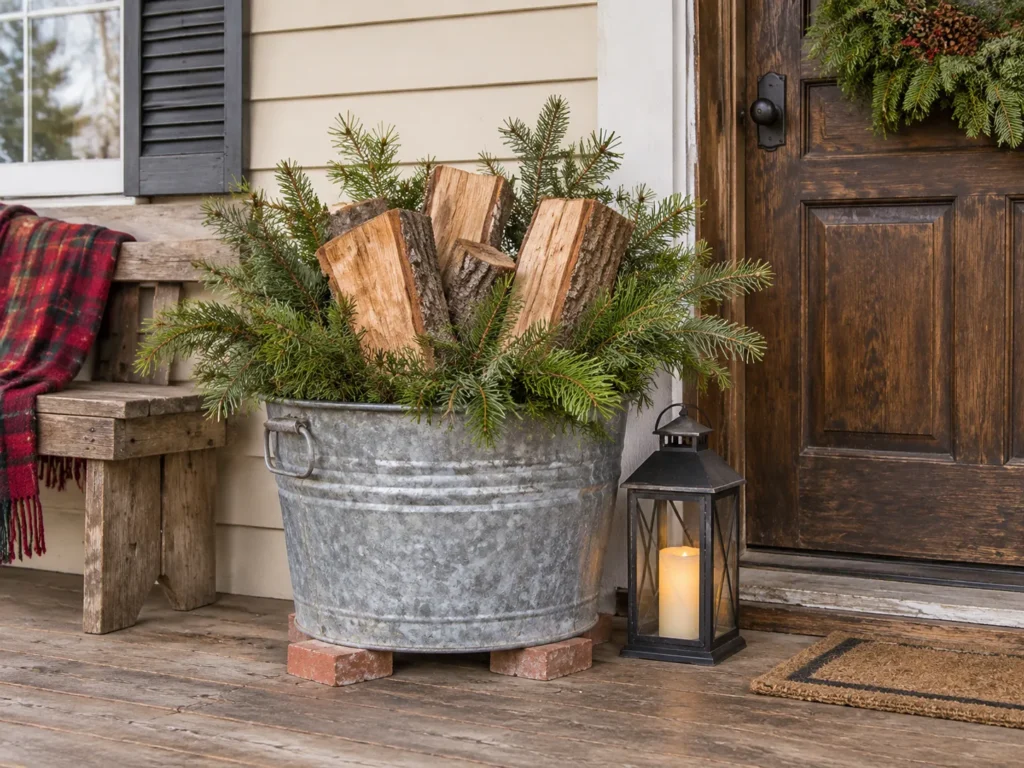
Feels like · cabin porch welcome
The Street View and Curb Appeal: A big shiny wash tub sits by the front door, piled with split firewood and spruce sprigs. It reads as warm and homey from the street, and looks even cozier with a lantern glowing beside it.
Hardware and Materials to Gather:
- A large galvanized wash tub
- Kiln-dried split logs
- Fresh spruce or pine sprigs
- Four brick pavers
The Construction and Anchoring Step: Drill four drainage holes in the tub bottom. Set it on pavers so it doesn’t freeze to the porch. Stack logs vertically for height and tuck spruce around the rim. It’s heavy enough that wind won’t touch it.
Real-World Weatherproofing Hack: Kiln-dried logs carry fewer bugs than yard wood, so you can bring them inside for the fireplace later. The same tub and log look brings warmth inside too, like the textures in my cozy Thanksgiving living room ideas.
A reader once spent a weekend hot-gluing pinecones and ornaments onto a big outdoor wreath. It looked perfect on Saturday. By the first freezing night, half the pieces had popped off and were scattered across her porch steps.
The fix: Hot glue goes brittle in the cold. For outdoor builds, use exterior construction adhesive, floral wire or all-weather tape instead.
13. Giant PVC-Framed Gift Boxes in Waterproof Vinyl

Feels like · presents for the whole street
The Street View and Curb Appeal: Three huge wrapped presents stacked on the lawn, tied with giant bows, look like a holiday card from the road. Lit from inside, they glow through the vinyl like paper lanterns.
Hardware and Materials to Gather:
- 3/4 inch PVC pipe and 3-way corner connectors
- Translucent colored vinyl sheeting or outdoor tablecloth vinyl
- Wide outdoor ribbon
- Tent stakes and bungee cords
The Construction and Anchoring Step: Build cube frames from PVC in 24, 30 and 36 inch sizes with corner connectors. Wrap them in vinyl and fasten with outdoor zip ties through small punched holes. Hook a bungee to each bottom corner and pull it down to a tent stake, so the boxes stay put even in strong gusts.
Real-World Weatherproofing Hack: Cut two small slits in the top of each box so snow melt drains instead of pooling and stretching the vinyl. Use outdoor LED lights inside, which stay cool against the plastic.
14. Barn-Wood Sled Leaner With Weathered Brass Sleigh Bells
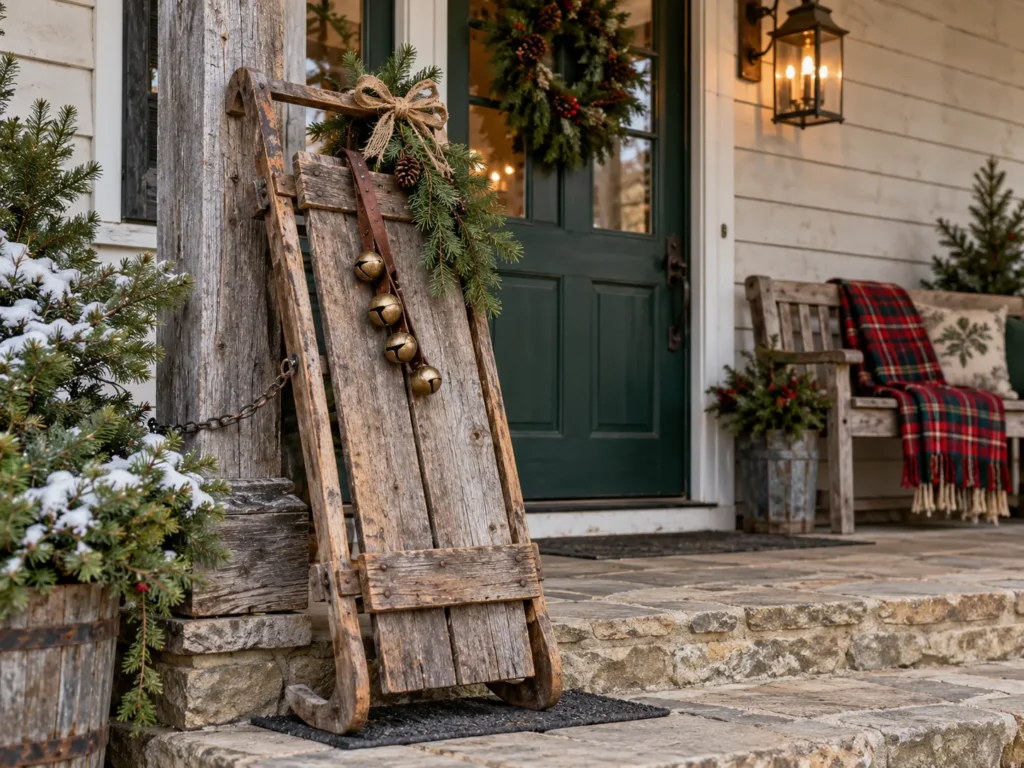
Feels like · vintage winter farm
The Street View and Curb Appeal: An old-fashioned wooden sled leans by the steps with a cluster of brass bells and a swag of pine. It’s simple, but it gives the whole porch a nostalgic, snowy-day feel.
Hardware and Materials to Gather:
- Reclaimed barn wood boards
- Two curved 2×6 runners cut with a jigsaw
- Brass sleigh bells on leather strap
- A heavy-duty screw eye and a short chain
The Construction and Anchoring Step: Screw barn boards across the two runners to form the sled deck. Lean it against the house wall or porch post, then fasten a screw eye into the post and clip a short chain to the sled’s top slat so it can’t slide or fall.
Real-World Weatherproofing Hack: Barn wood already looks weathered, so seal it with a matte exterior sealer instead of a glossy finish to keep the rough character. Set the runners on a rubber mat so they don’t sit in puddles.
15. Concrete Urn Evergreen Planters With Solar Flame Torches
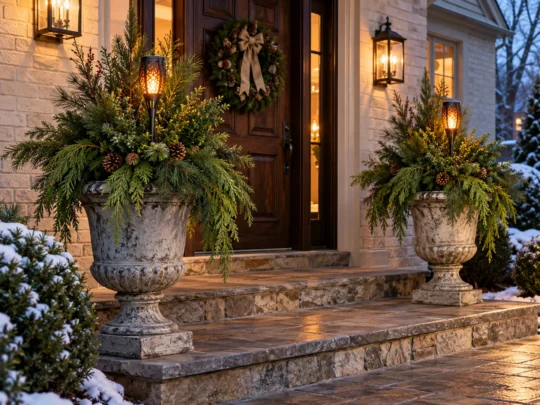
Feels like · grand estate entrance
The Street View and Curb Appeal: A pair of heavy urns packed with evergreen cuttings flanks the front door, with flickering solar torches rising from the center. They look classic and expensive, even from across the street.
Hardware and Materials to Gather:
- Two concrete or cast stone urns
- Mixed evergreen cuttings like pine, cedar and boxwood
- Floral foam or dense potting soil
- Heavy-duty solar flicker flame torches
The Construction and Anchoring Step: Fill each urn with soil, pressing it down firmly. Push the solar torch deep into the center first, then stick evergreen cuttings in a circle around it, tallest at the back. Concrete urns are heavy enough that they won’t move in the wind.
Real-World Weatherproofing Hack: Water the soil once before the first hard freeze. When it freezes, it locks the cuttings in place for the whole season. Angle the solar panels toward the south for the best charge on short winter days.
16. Fairy-Light Waterfall Tree Built on a Steel Conduit Pole
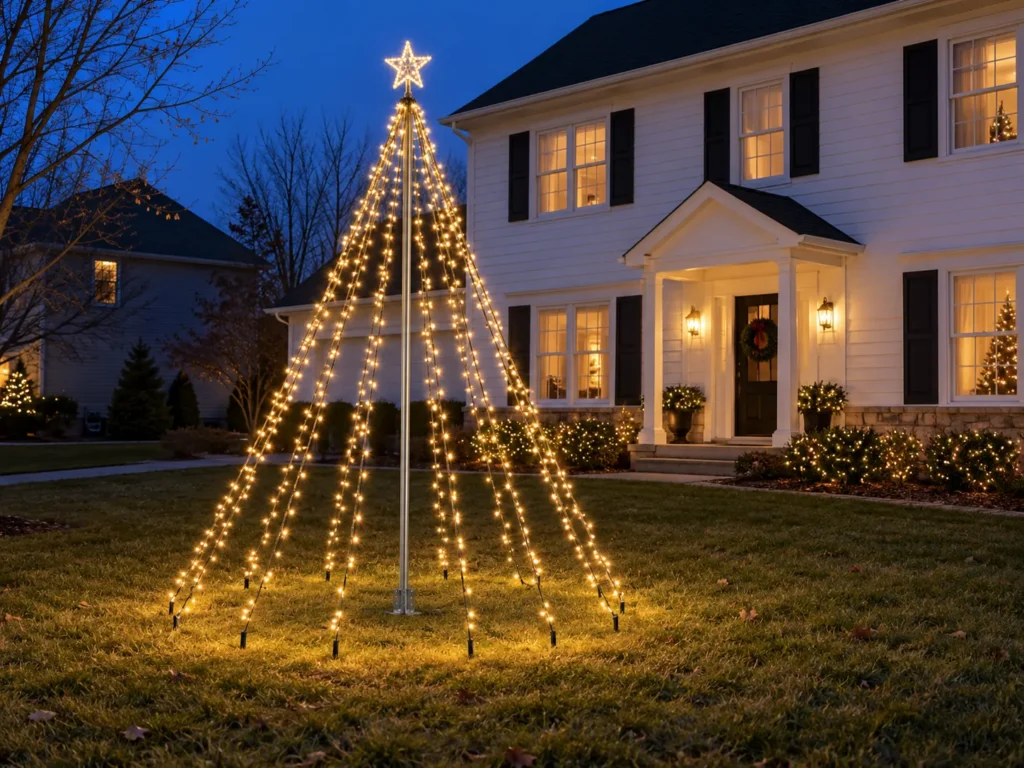
Feels like · cascading light fountain
The Street View and Curb Appeal: Dozens of strands of lights fan out from the top of a tall pole down to a ring on the ground, forming a giant glowing cone. It’s the biggest statement on the street, and you can see it from blocks away.
Hardware and Materials to Gather:
- A 10 foot length of 3/4 inch steel EMT conduit
- A 3 foot length of 1/2 inch rebar
- 8 to 12 strands of outdoor LED string lights
- Tent stakes and a large hose clamp
The Construction and Anchoring Step: Drive the rebar 18 inches into the ground and slide the conduit over it. Clamp all the light strand ends to the top of the pole with a hose clamp. Walk each strand out to a circle about 6 feet wide and stake it down, pulling it taut. The evenly tensioned strands work like guy lines and hold the pole steady.
Real-World Weatherproofing Hack: Check how many strands your lights allow end to end on the package, and use a power stake or outdoor multi-outlet at the base rather than chaining too many together. Add a star on top only if it’s lightweight.
17. Vintage Wagon Wheel Border With Pine Boughs and Edison Bulbs
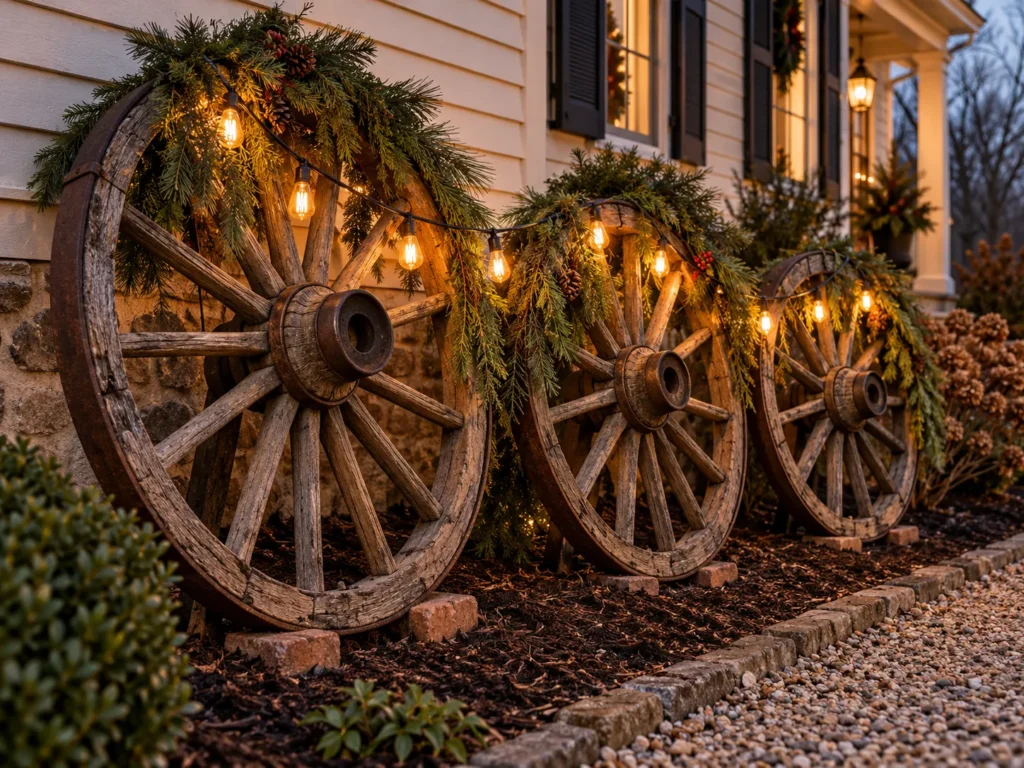
Feels like · old western homestead
The Street View and Curb Appeal: A couple of old wagon wheels lean along the garden bed, draped with pine and strings of warm Edison bulbs. It looks rustic and storied by day and glows like a vintage porch at night.
Hardware and Materials to Gather:
- 2 or 3 vintage wagon wheels or reproductions
- Faux or fresh pine boughs
- Outdoor-rated LED Edison string lights, 2200K to 2700K
- Rebar stakes and zip ties
The Construction and Anchoring Step: Drive a rebar stake behind each wheel and zip-tie the rim to it near the top. Lay pine boughs over the top half, wire them to the spokes and drape lights across the wheels in a gentle swag.
Real-World Weatherproofing Hack: Set old wooden wheels on two bricks so the rims never sit in wet soil. Edison-style LEDs give the same warm glow as old bulbs without the heat, and my warm cozy home lighting ideas explain why that 2200K to 2700K range always feels inviting.
18. Plywood Window-Frame Illusion Screen With Soft Backlighting
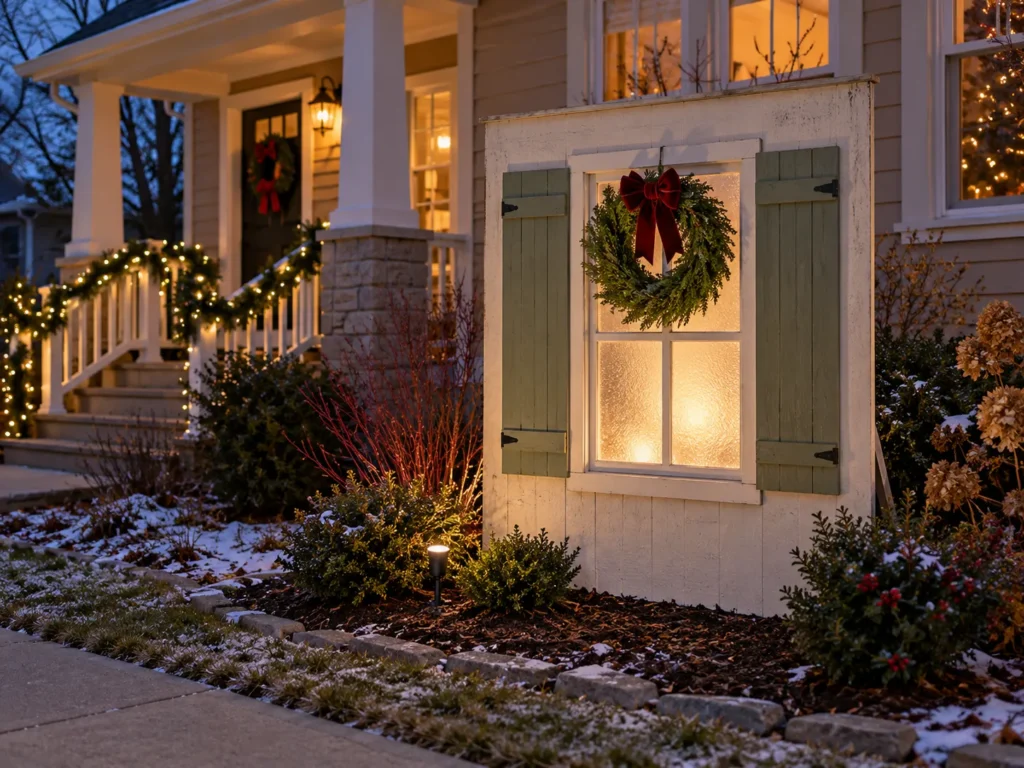
Feels like · peek into a cozy cottage
The Street View and Curb Appeal: A freestanding painted window frame stands in the mulch bed, complete with a little wreath and shutters. Backlit at night, it glows like a cozy cottage window right in the middle of your yard.
Hardware and Materials to Gather:
- 1/2 inch exterior plywood and 1×2 trim
- Frosted polycarbonate panel for the window glass
- A small outdoor LED floodlight in warm white
- Two 24 inch rebar stakes and conduit straps
The Construction and Anchoring Step: Cut a 4 by 5 foot plywood panel with a window opening, frame it with trim and screw the polycarbonate behind it. Paint shutters on the sides. Anchor it the same way as the reindeer, with conduit straps slid over rebar, then set the floodlight in the mulch behind it pointing up.
Real-World Weatherproofing Hack: A big flat panel catches wind like a sail, so add a guy line from the top back to a stake behind it. Seal the polycarbonate edges with exterior silicone so water doesn’t get trapped behind it. It’s the outdoor version of the warm, lived-in style we love at Living Style Bliss.
3 Critical Safety and Electrical Rules for Outdoor Yards
- Plug into GFCI outlets and use drip loops. Every outdoor light should run through a GFCI-protected outlet with outdoor-rated cords. Let each cord dip below the outlet before rising to it, so water drips off the low point instead of running into the plug. Weatherproof connector boxes cover the joints in between.
- Ditch hot glue outdoors. Standard hot glue becomes brittle in freezing weather and pops right off. Use exterior construction adhesive, exterior screws, floral wire or an all-weather tape like Gorilla All Weather tape instead.
- Lift wood off the grass. Untreated wood sitting on wet sod wicks up water and rots fast. Raise bases 1 to 2 inches on brick pavers or rubber feet, and seal every cut edge.
Frequently Asked Questions
How do you anchor large wooden Christmas yard cutouts so they don’t blow over in the wind?
Screw two conduit straps to the back and slide them over 24 inch rebar stakes driven about a foot into the ground. For very large pieces, add a guy line from the top back to a stake.
What is the best sealant to protect painted wooden outdoor holiday decorations from snow and rain?
Exterior spar urethane or marine varnish over exterior paint works best. Apply two to three coats, paying extra attention to the cut edges and screw holes.
How can you hide messy outdoor green extension cords across a front lawn?
Run green outdoor cords along the edges of garden beds and pin them with landscape staples, or tuck them under mulch. Where cords cross a walkway, use a rubber cord cover so nobody trips.
There’s nothing quite like hearing a neighbor ask where you bought that reindeer, and getting to say you made it. Build it sturdy, seal it well and light it with care, and these DIY outdoor Christmas yard decorations will come back out for years, collecting new memories every season. Pick a project to start with this weekend, and pin your favorite to your Christmas Pinterest board so it’s ready when the sawdust starts flying.